 All we need: a D-Link DSL-320B Modem (Annex A), a Carambola with
Devboard, power source, an unassembled cover, and some Ethernet
cables.
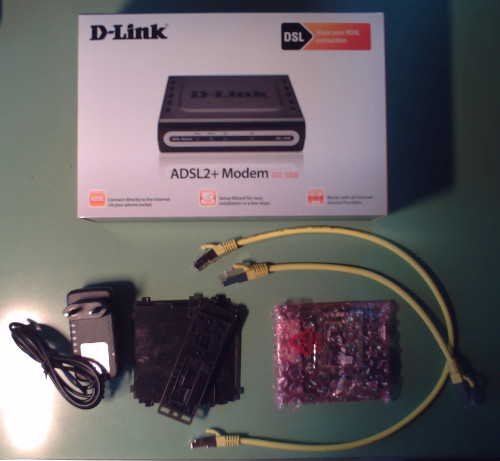
All we need: a D-Link DSL-320B Modem (Annex A), a Carambola with
Devboard, power source, an unassembled cover, and some Ethernet
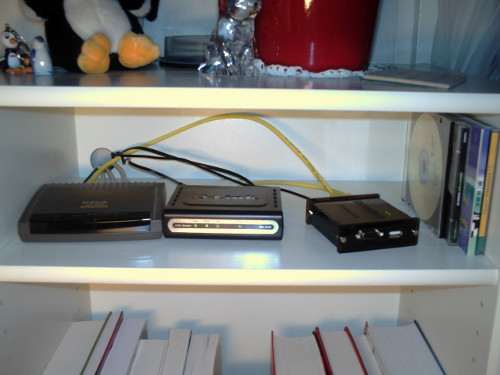
cables.This document describes my way of using the Carambola from 8devices as a router connecting my home network to the ISP Swisscom. It is shipped with OpenWRT preinstalled. I use a modem in bridge mode, PPPoE, 6rd to access the IPv6 internet, a firewall, QoS, and even self-compiled OpenWRT modules. This document is mainly intended as a step-by-step guide to set up more Carambolas with similar configuration. It can also be used to get inspiration for setting up other installations of OpenWRT.
These instructions are tailored to OpenWRT r33735 from the Carambola repository with Kernel version 3.3.8. Newer versions of OpenWRT work among the same lines, but the details may differ.
See the main page for further documents and other versions of this manual.
The reason for approaching this project was a mixture of necessity and hybris. My friend Peter was very unhappy with his connection to our internet service provider. In fact, he couldn't configure his router: It was remote-managed by the ISP and every attempt at blocking them managing ended in a screwed up internet connection. I on the other hand, was very happy with my old Zyxel router. The only thing it lacked was IPv6 support. Therefore we both looked what consumer routers could be found on the market. Nothing was satisfying: All of them could only be configured by web interfaces. We wanted to use SSH for this and we wanted to be able to configure everything. It became clear that the only option was to buy an ADSL modem and attach a Linux device to it as router. Of course, one could have used a PC of any form factor, but it would have been an overkill. Then we found out about the Carambola and figured that its small size, low power consumtpion and absolutely no noise are clear advantages. So, what could possibly go wrong? With my year-long Linux experience, the configuration fell into my hands of course. Peter then replayed all necessary steps with ease in about one day.
Main tinkerer and author is Urs Holzer. The incentive for this project, proofreading, and replaying of the installation procedure is due to Peter Michael.
If you want to follow these instructions, you should have a solid
understanding of the basics of Linux. You should know about
ifconfig. Also, you need to be familiar with the text
editor vi. Note that the vi on the carambola lacks some features like
undo in order to use as less RAM as possible. You also should roughly
how IPv4, IPv6, DHCP and DNS work.
Every time I say that I make changes to a file, I use the
vi text editor. (I.e. running vi filename as
command.)
While all information required should be part of the text, there are also some visual hints inside the command listings.
A simple command listing. These commands are run on the carambola

root@OpenWrt:~# uname -a
A command formatted like this doesn't cause any change on the machine
it is run. It only provides useful imformation as output.

root@OpenWrt:~# opkg update
A commando like this actually changes something. Maybe permanent,
maybe just for the current session.

root@OpenWrt:~# /etc/init.d/network reload
Such a command reloads a changed configuration. It is usually run
after modifying a configuration file.

Something which is important is marked like
this.
This command listing is not executed on the carambola, but on another
computer.
This listing contains the complete content of a file. Mostly, it is a
configuration file at this point of the installation.

When something has been changed in a document, it is marked up like
this.
This listing contains a part of a file. This is usually done, when
part of a configuration file is changed. It avoids showing information
unrelated to the task at hand.
All we need: a D-Link DSL-320B Modem (Annex A), a Carambola with
Devboard, power source, an unassembled cover, and some Ethernet
cables.
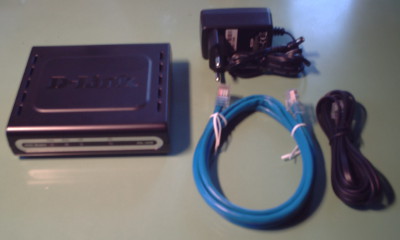 The D-Link DSL-320B Modem comes with power source, Ethernet cable
and a RJ-11 telefone cable. I am not going to trust these cables, I
will use the old phone cable and the Ethernet cables I bought. Note
that this Modem does not only support bridge mode, it can also do
PPPoE itself and has a DHCP server, so one can connect one computer.
But only one, even though the configuration dialogs
make one think otherwise. (Might be a bug though.) This fact makes
testing the modem easier: We do not need to have set up a seperate
PPPoE client beforehand.
The D-Link DSL-320B Modem comes with power source, Ethernet cable
and a RJ-11 telefone cable. I am not going to trust these cables, I
will use the old phone cable and the Ethernet cables I bought. Note
that this Modem does not only support bridge mode, it can also do
PPPoE itself and has a DHCP server, so one can connect one computer.
But only one, even though the configuration dialogs
make one think otherwise. (Might be a bug though.) This fact makes
testing the modem easier: We do not need to have set up a seperate
PPPoE client beforehand.
Before we test the modem, we pay a visit to D-Link's website. This website receives a honorable mention, because access the product information is terribly easy. There is a input box where you can enter your product name and you immediately have the product information and a link to downloads which also contain firmware updates. Yes, there is an update. So, I download the zip file and inside, there are release notes:
It is unknown to me how a modem (especially in bridge mode) should be related to an addon of firefox, so I don't think I should risk bricking the device by updating the firmware. Anyway, I have to later check wich version of the firmware is already on the device.
Time to test the modem. For security reasons, never attach a device to the internet before configuring it, although in this case, the modem won't be able to connect to the internet, because it does not have the necesssary login information. So, I connect the modem to the power plug and my laptop and press the power button. As my laptop does not connect to any network automatically, I have to setup the interface manually. Of course I could use DHCP to obtain an IP from the Modem as it has an activated DHCP server by default, but I like to use a static IP. (The reason is that deactivating the DHCP server on the modem will make you loose your IP, the renewal time is set up awfully short.) By default, the modem listens at 192.168.1.1. I use the IP 192.168.1.2 for the laptop and netmask of 255.255.255.0.
root@digikal:/home/urs# ifconfig eth0 up
root@digikal:/home/urs# ifconfig eth0 192.168.1.2 netmask 255.255.255.0
root@digikal:/home/urs# ifconfig
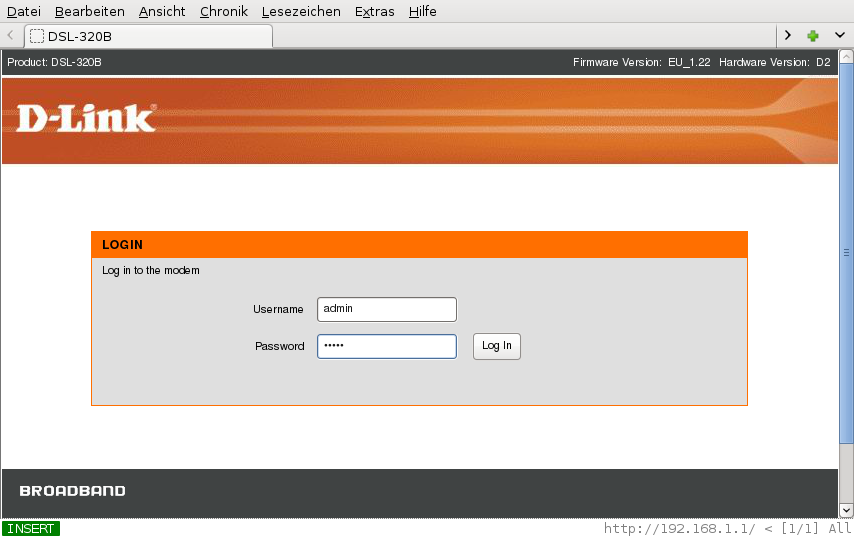
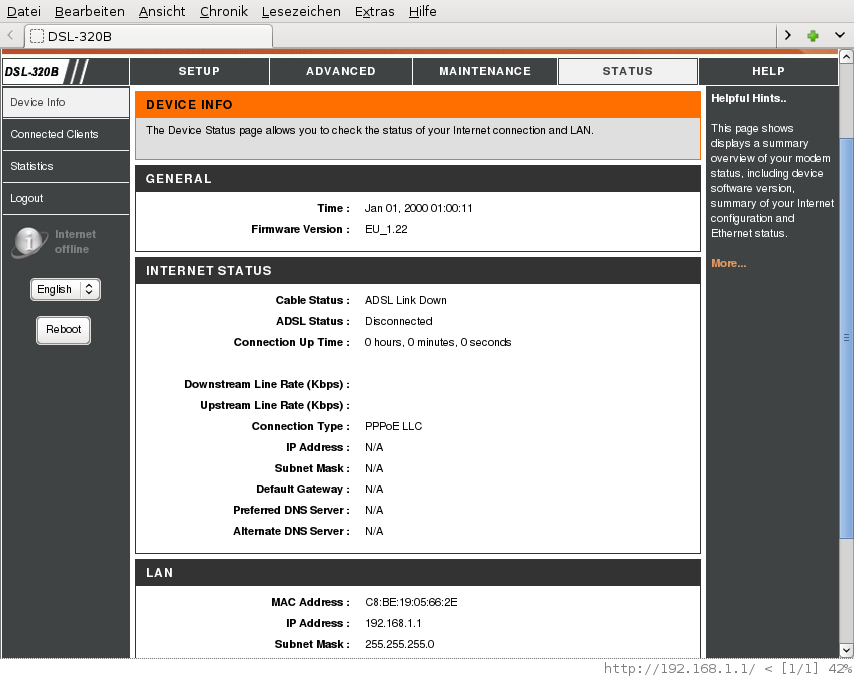
The modem is configured through a web-interface (hrmpf, why do they no
longer produce consumer devices with telnet or ssh text based
interfaces? These web interface are riddled with bugs and security
holes. Even for this simple modem we managed it in our tests
beforehand to mess up the webinterface with a reset as the only way to
fix it.) I start a browser and connect to
http://192.168.1.1. Username and password are both
admin. Here we also see that the Firmware is EU_1.22. The
newest one is EU_1.23 and it fixes something irrelevant, as explained
above. So I
will devinitly not make a firmware update. This I will have to
reconsider should a new release of the firmware be published.
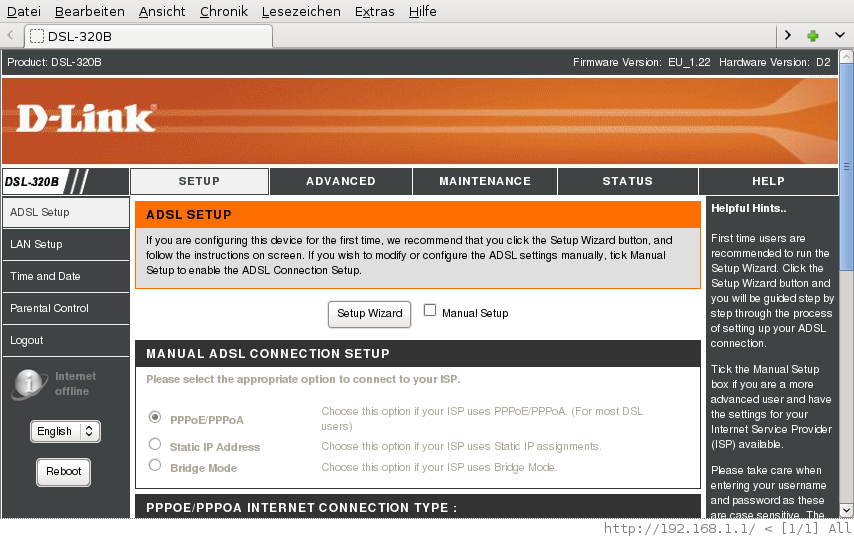
As a reference, here the configuration of my current router (good old telnet interface):
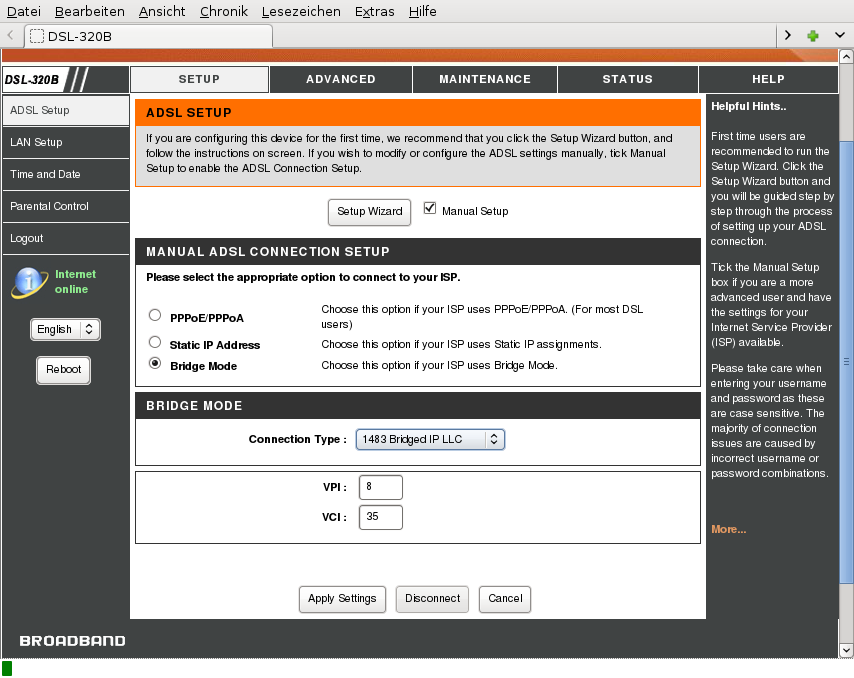
Of course I tick the checkbox for manual setup. Later I will put the modem into bridge mode. Now I want to test whether it can connect correctly to my ISP (Swisscom). The information from my old router comes in handy now. They should also be available from Swisscom's website, but I guess one would have to make some effort to find them.
| Field | Value |
|---|---|
| Username | u.holzer@bluewin.ch |
| Password | gro.mulmul.89 |
| Service Name | |
| Connection Type | PPPoE LLC |
| MTU | 1400 |
| Idle Time Out | 0 |
| VPI | 8 |
| VCI | 35 |
I hit the apply button and restart the modem.
 Before I forget it, I set the password for the modem to something
more sensible than
Before I forget it, I set the password for the modem to something
more sensible than amdin
. This is done in the menu called
MAINTENANCE. I also pay a visit to the various subsections in SETUP.
One thing is striking: The modem can not be configured to a date after
2012 using this web interface. The is no reason the modem could'nt
handle such dates as I believe it runs a Linux kernel and I don't know
of any protocols that should have such a problem. Anyway, there is
nothing more to be done for now.
Time to log out and switch off the modem. Time for a break.
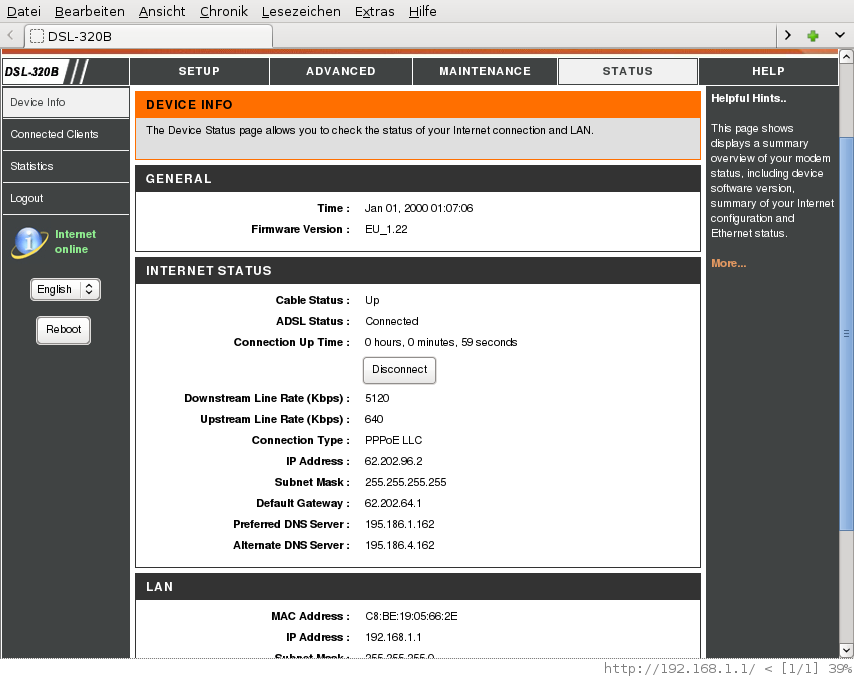
Now I switch back on, log in and check whether the settings
survived the power cycle. Indeed, they did. Now I switch to the STATUS
section.
 Note that this page reloads regularly (if supported by the browser).
Now it is time to connect the RJ-11 cable to the phone line (mind the
splitters) and the modem. We will see whether the connection comes up
automatically. It does
Note that this page reloads regularly (if supported by the browser).
Now it is time to connect the RJ-11 cable to the phone line (mind the
splitters) and the modem. We will see whether the connection comes up
automatically. It does
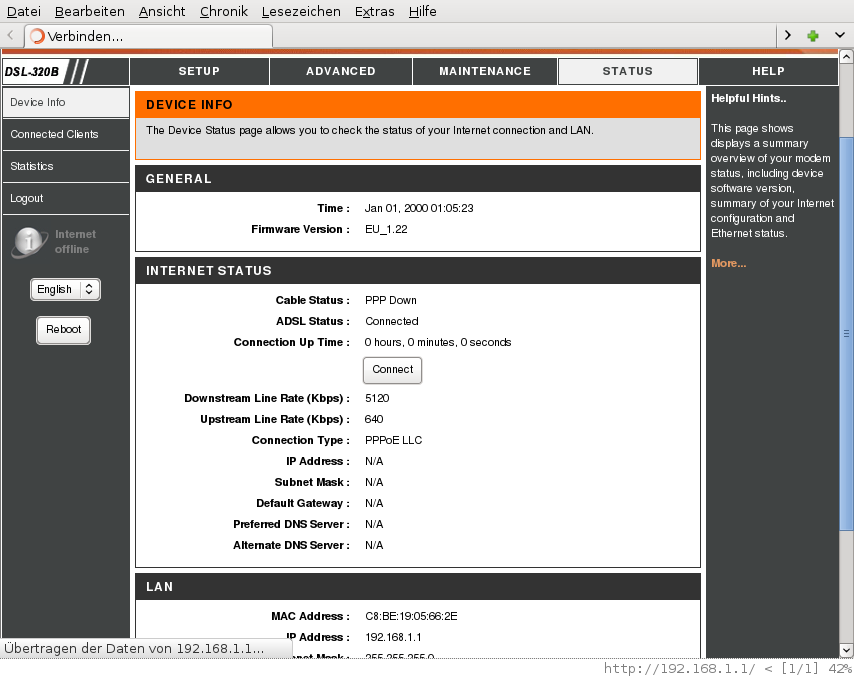 First, ADSL comes up, but PPP is missing. After a while, PPP is
available too:
First, ADSL comes up, but PPP is missing. After a while, PPP is
available too:
 Good, to test, I activate DHCP to get nameserver information from the
modem.
Good, to test, I activate DHCP to get nameserver information from the
modem.
root@digikal:/home/urs# dhclient eth0 -v
Good. I go back to the browser and check some websites. They work. Now I want to do a stress test. A big download, for example a Knoppix image for a CD. I take a FTP mirror near me.
urs@digikal:~$ wget ftp://mirror.switch.ch/mirror/knoppix/KNOPPIX_V7.0.5CD-2012-12-21-DE.iso
 »KNOPPIX_V7.0.5CD-2012-12-21-DE.iso«
Auflösen des Hostnamen »mirror.switch.ch (mirror.switch.ch)«... 130.59.10.36, 2001:620:0:8::20
Verbindungsaufbau zu mirror.switch.ch (mirror.switch.ch)|130.59.10.36|:21... verbunden.
Anmelden als anonymous ... Angemeldet!
==> SYST ... fertig.    ==> PWD ... fertig.
==> TYPE I ... fertig.  ==> CWD (1) /mirror/knoppix ... fertig.
==> SIZE KNOPPIX_V7.0.5CD-2012-12-21-DE.iso ... 731115520
==> PASV ... fertig.    ==> RETR KNOPPIX_V7.0.5CD-2012-12-21-DE.iso ... fertig.
Länge: 731115520 (697M) (unmaßgeblich)

100%[=========================================================>] 731'115'520  521K/s   in 23m 10s

2013-02-01 19:39:01 (514 KB/s) - »»KNOPPIX_V7.0.5CD-2012-12-21-DE.iso«« gespeichert [731115520]
]]>
It indeed reaches the speed I expected. The modem is working. The only thing I am not happy about is that the status LED is still blinking. But whatever. (Instead, the DSL lamp should be blinking in my opinion. It turns out, blinking status light means that everything is in order.)
The test is complete. It is time to switch the modem to bridge
mode. Again, I log into http://192.168.1.1
 After applying the settings, my laptop will lose the IP address, since the DHCP
server shuts down and the renewal time is very short. I would have to revert to manual IP configuration,
but the modem is correctly configured now, so I can continue with the
router. Note that the modem does not do any PPPoE in bridge mode.
Therefore, the router will have to be configured to handle it. Time to
switch off and unplug the modem.
After applying the settings, my laptop will lose the IP address, since the DHCP
server shuts down and the renewal time is very short. I would have to revert to manual IP configuration,
but the modem is correctly configured now, so I can continue with the
router. Note that the modem does not do any PPPoE in bridge mode.
Therefore, the router will have to be configured to handle it. Time to
switch off and unplug the modem.
First I remove the protective foil from the six parts of the case.
Screws to hold the case together have not been delivered together with
the carambola. Fortunately, I do have them on stock: eight M3x10
screws, 12 nuts and 4 washers. I use a nut together with a washer as
a distance holder between bottom plate and board. (Note that in the
photos below, the screws have not yet been placed.)

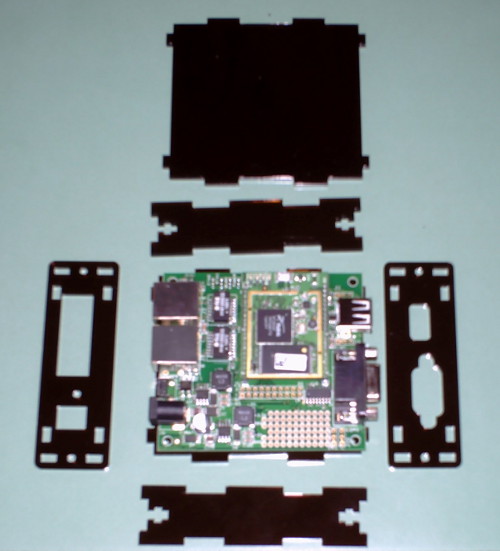

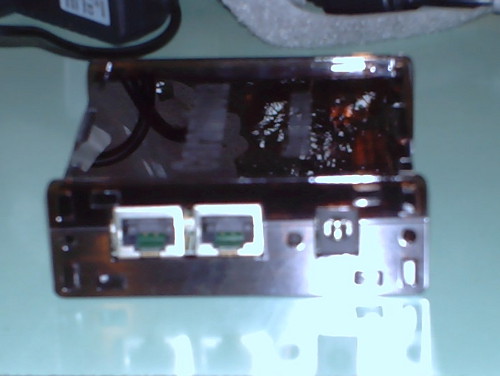
The backplate is equiped with two with two ethernet ports.
According to the drawings on the 8devices website, the right one is
LAN (first ethernet port) and the left one is for WAN (second ethernet
port). To configure, one has to use the LAN one, i.e. the right
one. To the right is the power port to which I now attach my power
source. (And also, there is a reset button. No need to keep your paper
clips ready though, this isn't Windows!) The other side provides us a
USB port and a serial port. The serial port should be used for
configuration, as it allows direct access to a console. This is very
useful if something goes wrong with the LAN (e.g. wrong iptables rules
or sshd not starting). This is, if I had a serial cable, I could use
it. Guess I should order a USB to serial adapter. However, for the
moment LAN will do, but I have to be careful what nonesens I
configure.
The instructions corresponding to these steps can be found on OpenWRT's website.
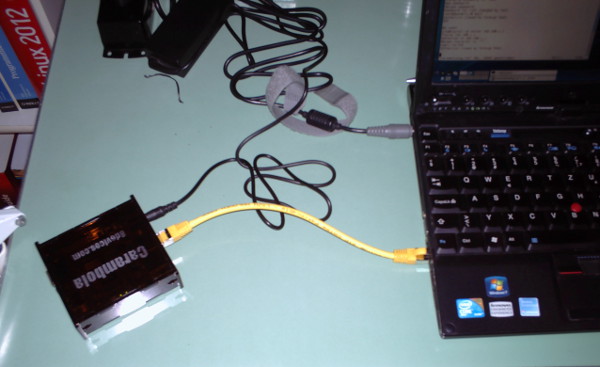 I attach the Carambola to the power and its right ethernet port
to my laptop. The laptop needs to have IP 192.168.1.2. The LEDs
of the carambola are clearly visible through the case. Now I login
with
I attach the Carambola to the power and its right ethernet port
to my laptop. The laptop needs to have IP 192.168.1.2. The LEDs
of the carambola are clearly visible through the case. Now I login
with telnet 192.168.1.1. A password must be set. Then
exit.
urs@digikal:~$ telnet 192.168.1.1
 === IMPORTANT ============================
  Use 'passwd' to set your login password
  this will disable telnet and enable SSH
 ------------------------------------------


BusyBox v1.19.4 (2012-10-13 02:55:36 EEST) built-in shell (ash)
Enter 'help' for a list of built-in commands.

  _______                     ________        __
 |       |.-----.-----.-----.|  |  |  |.----.|  |_
 |   -   ||  _  |  -__|     ||  |  |  ||   _||   _|
 |_______||   __|_____|__|__||________||__|  |____|
          |__| W I R E L E S S   F R E E D O M
 -----------------------------------------------------
 BARRIER BREAKER (Bleeding Edge, r33735)
 -----------------------------------------------------
  * 1/2 oz Galliano         Pour all ingredients into
  * 4 oz cold Coffee        an irish coffee mug filled
  * 1 1/2 oz Dark Rum       with crushed ice. Stir.
  * 2 tsp. Creme de Cacao
 -----------------------------------------------------
root@OpenWrt:/# passwd
Changing password for root
New password:
Retype password:
Password for root changed by root
root@OpenWrt:/# exit
Connection closed by foreign host.
Telnet should now be gone. I verify this by trying again.
urs@digikal:~$ telnet 192.168.1.1
Trying 192.168.1.1...
Connected to 192.168.1.1.
Escape character is '^]'.
Login failed.
Connection closed by foreign host.
The instructions corresponding to this section can be found on OpenWRT's website.
Before I go to any configuration, I look up some basic stuff.
urs@digikal:~$ ssh -l root 192.168.1.1
BusyBox v1.19.4 (2012-10-13 02:55:36 EEST) built-in shell (ash)
Enter 'help' for a list of built-in commands.

  _______                     ________        __
 |       |.-----.-----.-----.|  |  |  |.----.|  |_
 |   -   ||  _  |  -__|     ||  |  |  ||   _||   _|
 |_______||   __|_____|__|__||________||__|  |____|
          |__| W I R E L E S S   F R E E D O M
 -----------------------------------------------------
 BARRIER BREAKER (Bleeding Edge, r33735)
 -----------------------------------------------------
  * 1/2 oz Galliano         Pour all ingredients into
  * 4 oz cold Coffee        an irish coffee mug filled
  * 1 1/2 oz Dark Rum       with crushed ice. Stir.
  * 2 tsp. Creme de Cacao
 -----------------------------------------------------
root@OpenWrt:~# uname -a
Linux OpenWrt 3.3.8 #16 Mon Oct 29 18:27:35 EET 2012 mips GNU/Linux
root@OpenWrt:~# ifconfig
br-lan    Link encap:Ethernet  HWaddr C4:93:00:00:0D:7F
          inet addr:192.168.1.1  Bcast:192.168.1.255  Mask:255.255.255.0
          UP BROADCAST RUNNING MULTICAST  MTU:1500  Metric:1
          RX packets:296 errors:0 dropped:0 overruns:0 frame:0
          TX packets:252 errors:0 dropped:0 overruns:0 carrier:0
          collisions:0 txqueuelen:0
          RX bytes:23953 (23.3 KiB)  TX bytes:24714 (24.1 KiB)

eth0      Link encap:Ethernet  HWaddr C4:93:00:00:0D:7F
          UP BROADCAST RUNNING MULTICAST  MTU:1500  Metric:1
          RX packets:296 errors:0 dropped:0 overruns:0 frame:0
          TX packets:861 errors:0 dropped:0 overruns:0 carrier:0
          collisions:0 txqueuelen:1000
          RX bytes:29281 (28.5 KiB)  TX bytes:273030 (266.6 KiB)
          Interrupt:5

eth0.1    Link encap:Ethernet  HWaddr C4:93:00:00:0D:7F
          UP BROADCAST RUNNING MULTICAST  MTU:1500  Metric:1
          RX packets:296 errors:0 dropped:0 overruns:0 frame:0
          TX packets:252 errors:0 dropped:0 overruns:0 carrier:0
          collisions:0 txqueuelen:0
          RX bytes:23953 (23.3 KiB)  TX bytes:24714 (24.1 KiB)

eth0.2    Link encap:Ethernet  HWaddr C4:93:00:00:0D:7F
          UP BROADCAST RUNNING MULTICAST  MTU:1500  Metric:1
          RX packets:0 errors:0 dropped:0 overruns:0 frame:0
          TX packets:609 errors:0 dropped:0 overruns:0 carrier:0
          collisions:0 txqueuelen:0
          RX bytes:0 (0.0 B)  TX bytes:244818 (239.0 KiB)

lo        Link encap:Local Loopback
          inet addr:127.0.0.1  Mask:255.0.0.0
          UP LOOPBACK RUNNING  MTU:16436  Metric:1
          RX packets:0 errors:0 dropped:0 overruns:0 frame:0
          TX packets:0 errors:0 dropped:0 overruns:0 carrier:0
          collisions:0 txqueuelen:0
          RX bytes:0 (0.0 B)  TX bytes:0 (0.0 B)

root@OpenWrt:~# cat /etc/opkg.conf
src/gz snapshots http://pkg.8devices.com/v2.3/carambola/packages
# src/gz barrier_breaker http://downloads.openwrt.org/snapshots/trunk/ramips/packages
dest root /
dest ram /tmp
lists_dir ext /var/opkg-lists
option overlay_root /overlay
root@OpenWrt:/etc/config# mount
rootfs on / type rootfs (rw)
/dev/root on /rom type squashfs (ro,relatime)
proc on /proc type proc (rw,noatime)
sysfs on /sys type sysfs (rw,noatime)
tmpfs on /tmp type tmpfs (rw,nosuid,nodev,noatime,size=14960k)
tmpfs on /dev type tmpfs (rw,noatime,size=512k,mode=755)
devpts on /dev/pts type devpts (rw,noatime,mode=600)
root on /tmp/root type tmpfs (rw,noatime,mode=755)
overlayfs:/tmp/root on /tmp/root type overlayfs (ro,noatime,lowerdir=/,upperdir=/tmp/root)
debugfs on /sys/kernel/debug type debugfs (rw,relatime)
none on /proc/bus/usb type usbfs (rw,relatime)
/dev/mtdblock5 on /overlay type jffs2 (rw,noatime)
overlayfs:/overlay on / type overlayfs (rw,noatime,lowerdir=/,upperdir=/overlay)
root@OpenWrt:~# cd /etc/config/
root@OpenWrt:/etc/config# cat network

config interface 'loopback'
	option ifname 'lo'
	option proto 'static'
	option ipaddr '127.0.0.1'
	option netmask '255.0.0.0'

config interface 'lan'
	option ifname 'eth0.1'
	option type 'bridge'
	option proto 'static'
	option ipaddr '192.168.1.1'
	option netmask '255.255.255.0'
	option macaddr 'c4:93:00:00:0d:7f'

config interface 'wan'
	option ifname 'eth0.2'
	option proto 'dhcp'

config switch
	option name 'rt305x'
	option reset '1'
	option enable_vlan '1'

config switch_vlan
	option device 'rt305x'
	option vlan '1'
	option ports '1 2 3 4  6t'

config switch_vlan
	option device 'rt305x'
	option vlan '2'
	option ports '0  6t'
Indeed, the interfaces are configured intriguingly but as expected.
Consider the config interface sections. The name
mentioned behind interface denotes a logical
interface which is configured in this section. The names given by
option ifname denote physical interfaces.
Indeed, the carambola has the physical interfaces eth0.1
(right one) and eth0.2 (left one). lan and
wan are configured as expected. It is the configuration
of wan which I will have to change first in order to get
access to the internet over Carambola. Looking at
/etc/config/firewall suggests that the firewall is
configured as it should, namely that noone can connect to the router
from WAN:
But iptables -S seems to say otherwise.
root@OpenWrt:/etc/config# iptables -S
According to my reasoning, everything coming from WAN would be accepted. But maybe this is, because no such interface for WAN is present. Attaching the WAN port to my old home router however causes the rules to be added:
root@OpenWrt:/etc/config# iptables -S
After this short assesment I feel confident that I can attach this device to the internet without getting blasted immediately. The first thing to get right will be the PPPoE connection to my ISP.
As I have no serial cable at hand, I must make shure that a misconfiguration doesn't mean the end. On the other hand, every system that helps recovering from mistakes may itself introduce problems. It is important to be very thoughtful what one does when following the instructions of this section. Everyone who can connect to his Caranbola via the serial port does skip this section!
In order to recover from misconfiguration, one can do something
very trivial: After every boot, copy configuration files known to be good
back to /etc/config. This requires that configuration files are
not read again after booting. Otherwise, testing becomes difficult.
(In fact, I will later introduce myip6updated, which is a daemon
causing configuration files to be reread. This recovery system will
then still be useful, but after a reboot a mix of the new and the "good"
configuration will be used, which one has to keep in mind.)
root@OpenWrt:/etc/config# mkdir /root/old
root@OpenWrt:/etc/config# cp * /root/old
root@OpenWrt:/etc/config# mkdir /root/good
root@OpenWrt:/etc/config# cp * /root/good
Rescue code goes into /etc/rc.local: (Open the file
with vi /etc/rc.local in order to edit it. It is your own
duty to know vi, I am not going to explain how one uses it.)
Every time I make changes to configuration files and I can still
connect to the Carambola after a reboot, I can make the changes in
/root/good too. (If you follow these instructions and use
this quick and dirty approach, you must yourself figure out when it
makes sense and when it is needed to copy your changes to
/root/good.)
For my local network I want:
Configuring this doesn't seem difficult, I just need to edit
/etc/config/dhcp.
Current configuration:
root@OpenWrt:/etc/config# cat dhcp
The default configuration is sane in general. I make changes to
/etc/config/dhcp as follows:
config host
	option ip	'192.168.0.10'
	option mac	'00:25:22:41:50:e7'
	option name	'speedy'

config host
	option ip	'192.168.0.11'
	option mac	'00:26:2d:f8:f4:6d'
	option name	'digikal'
First, look at the section dhcp lan. Note that the pool contains the
addresses (the part not covered by the netmask) 100 to 100+150=250
(i.e. there are 251 addresses in the pool).
The WAN is ignored, I must not serve IP addresses and DNS to the outside.
Now for the static leases. The MAC address from the target system
can be obtained by running ifconfig there (look for
HWaddr). speedy
is my PC and digikal my laptop. (I am using the second one
to configure the Carambola.)
The clever reader notes that this will not work, since the router
itself has address 192.168.1.1 instead of 192.168.0.1. Therefore it's
time to change this. I change in /etc/config/network the
ipaddr of the interface lan to
192.168.0.1:
config interface 'lan'
        option ifname 'eth0.1'
        option type 'bridge'
        option proto 'static'
        option ipaddr '192.168.0.1'
        option netmask '255.255.255.0'
        option macaddr 'c4:93:00:00:0d:7f'
Now I restart networking to test whether it works.
/etc/init.d/network restart. DANGER: Be very
careful not to have made a mistake in network, as this would cause
networking to fail, which means that one can no longer connect to
the Carambola via LAN. I guess I do not have to mention that this
wrecks the current ssh connection.
I test it by running dhclient -v on my Laptop.
Unfortunately, it does not yet work and I have to the laptop's network
by hand:
root@digikal:/home/urs# dhclient eth0 -v

root@digikal:/home/urs# dhclient -r eth0
root@digikal:/home/urs# ifconfig eth0 192.168.0.2 netmask 255.255.255.0
So, I login again with SSH, this time to
192.168.0.1. Indeed, the network came up and login works.
DHCP does not work. Let's see. The problem becomes obvious once I
realise that not only networking has to be restarted, but
dnsmasq too: /etc/init.d/dnsmask restart.
Now I close the SSH connection and try dhclient again on my
laptop.
root@digikal:/home/urs# dhclient eth0 -v
Bang! In all my life, I never received a lease via DHCP this quickly.
That's it for the local part for the moment. Until further testing makes sense, I need to get up the WAN.
See also OpenWRT's page about networking. Some PPPoE modules are already loaded in the kernel:
root@OpenWrt:~# lsmod | grep ppp
But the deamon pppd is not installed. Indeed,
opkg list-installed | grep ppp indicates that the package
kmod-pppoe is installed, but not
ppp-mod-pppoe and ppp.
So we need a short intermezzo: We have to install a package. Like so:
root@OpenWrt:~# opkg update
Downloading http://pkg.8devices.com/v2.3/carambola/packages/Packages.gz.
Inflating http://pkg.8devices.com/v2.3/carambola/packages/Packages.gz.
Updated list of available packages in /var/opkg-lists/snapshots.
root@OpenWrt:~# opkg install ppp
Installing ppp (2.4.5-6) to root...
Downloading http://pkg.8devices.com/v2.3/carambola/packages/ppp_2.4.5-6_ramips.ipk.
Configuring ppp.
root@OpenWrt:~# opkg install ppp-mod-pppoe
Installing ppp-mod-pppoe (2.4.5-6) to root...
Downloading http://pkg.8devices.com/v2.3/carambola/packages/ppp-mod-pppoe_2.4.5-6_ramips.ipk.
Configuring ppp-mod-pppoe.
root@OpenWrt:~# opkg list-installed | grep ppp
kmod-ppp - 3.3.8-1
kmod-pppoe - 3.3.8-1
kmod-pppox - 3.3.8-1
ppp - 2.4.5-6
ppp-mod-pppoe - 2.4.5-6
Good, we are done with the intermezzo and can now configure PPPoE. We need to set some of the following variables: (Table has been taken from the networking page).
| Name | Type | Required | Default | Description |
|---|---|---|---|---|
username | string | no(?) | (none) | Username for PAP/CHAP authentication |
password | string | no(?) | (none) | Password for PAP/CHAP authentication |
ac | string | no | (none) | Specifies the Access Concentrator to connect to. If unset, pppd uses the first discovered one |
service | string | no | (none) | Specifies the Service Name to connect to, If unset, pppd uses the first discovered one |
connect | file path | no | (none) | Path to custom PPP connect script |
disconnect | file path | no | (none) | Path to custom PPP disconnect script |
keepalive | number | no | (none) | Number of connection failures before reconnect |
demand | number | no | (none) | Number of seconds to wait before closing the connection due to inactivity |
defaultroute | boolean | no | 1 | Replace existing default route on PPP connect |
peerdns | boolean | no | 1 | Use peer-assigned DNS server(s) |
dns | list of ip addresses | no | (none) | Override peer-assigned DNS server(s) |
ipv6 | boolean | no | 0 | Enable IPv6 on the PPP link |
pppd_options | string | no | (none) | Additional command line arguments to pass to the pppd daemon |
My modified wan section of
/etc/config/network (without the password, of
course):
The option demand indicates after how many seconds of inactivity the
PPPoE connection should be terminated. It is reactivated automatically
when it is needed again. Setting this is good if you have to pay your
ISP by the amount of time the connection is open. If you have a
static IP or you host a server which should be accessible from the
outside all the time, don't use this option. Unfortunately, according
to pppd(8), one needs to also set the IP address in cunjunction with
this option.
Since Bluewin uses dynamic IP addresses, this can not be known
beforehand. pppd(8) recommends not to use demand in this case:
When the demand option is
used, the interface IP addresses have already been set at the point
when IPCP comes up. If pppd has not been able to negotiate the same
addresses that it used to configure the interface (for example when
the peer is an ISP that uses dynamic IP address assignment), pppd has
to change the interface IP addresses to the negotiated addresses. This
may disrupt existing connections, and the use of demand dialling with
peers that do dynamic IP address assignment is not
recommended.
Setting the pppd option ipcp-accept-remote and using an
impossible remote IP would solve this problem. I don't know how one
would configure this with UCI.
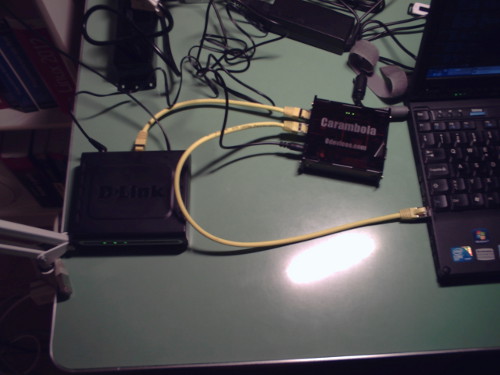
Time to test the setup: I attach my laptop to the Carambola, the modem to the Carambola WAN and the modem to the phone line. I switch on the modem. After waiting a while for the Carambola to boot, I run dhclient on my laptop in order to obtain an IP. I log into the carambola to check what is going on:
root@OpenWrt:~# ifconfig
Indeed, the interface is up and running. Testing some webpages tells me that indeed, the PPPoE connection is working and that forwarding from LAN to WAN works as expected, including masquerading, DNS and so on. Good. Let's do our Knoppix stress test again:
urs@digikal:~$ wget ftp://mirror.switch.ch/mirror/knoppix/KNOPPIX_V7.0.5CD-2012-12-21-DE.iso
 »KNOPPIX_V7.0.5CD-2012-12-21-DE.iso«
Auflösen des Hostnamen »mirror.switch.ch (mirror.switch.ch)«... 130.59.10.36, 2001:620:0:8::20
Verbindungsaufbau zu mirror.switch.ch (mirror.switch.ch)|130.59.10.36|:21... verbunden.
Anmelden als anonymous ... Angemeldet!
==> SYST ... fertig.    ==> PWD ... fertig.
==> TYPE I ... fertig.  ==> CWD (1) /mirror/knoppix ... fertig.
==> SIZE KNOPPIX_V7.0.5CD-2012-12-21-DE.iso ... 731115520
==> PASV ... fertig.    ==> RETR KNOPPIX_V7.0.5CD-2012-12-21-DE.iso ... fertig.
Länge: 731115520 (697M) (unmaßgeblich)

100%[===================================================================================================================>] 731'115'520  523K/s   in 22m 46s

2013-02-04 14:54:47 (523 KB/s) - »»KNOPPIX_V7.0.5CD-2012-12-21-DE.iso«« gespeichert [731115520]
]]>
It is nice to see that we reach the target speed. Watching
top on the carambola during the download indicates that
the Carambola has a lot of juice left. Only around 10% CPU load can be
seen. The worst offender should be the kernel itself handling all the
routing.
Failsafety: At this point it is time to thouroughly test whether the Carambola
boots correctly with the new settings in different circumstances,
i.e. modem attached, modem not attached and so on. (If it works one uses the poor
man's failsafe mechanism described in a section above, one should
create a new good configuration, i.e. copying everything from
/etc/config to /root/good.)
And everything again, this time for IPv6
Of course, the right thing would be for PPPoE to provide use with IPv6 addresses. Unfortunately, the peers from Bluewin do not support IPv6. So my small home network is stuck as a small IPv6 island attached to a IPv4-only network. Of course, the solution is to encapsulate IPv6 packages in IPv4 packages addressed to a dedicated IPv6 router. Indeed, Bluewin provides such a router. (Note that the router must know me, because he has to do the routing.) There are however different implementations. Bluewin uses a method called 6rd (IPv6 rapid deployment). Of course, OpenWRT provides packages which implement 6rd too, so we are nearly ready to go.
On the OpenWRT Wiki there is a page about the configuration of 6rd. Slightly outdated, but still interesting is the Linux IPv6 howto.
Basically, you get a bunch of IPv6 addresses assigned by the ISP. Such an address consists of three parts: The first part is a prefix that belongs to the ISP, the second part is the dynamic IPv4 address assigned to you, or, in order to save space, a part of your IPv4 address, and the last part the bolongs to you. These addresses are then handed out by the router to the devices in your network. Note that NAT is no longer required in IPv6 networks, because there are enough IPv6 adresses for every host.
This method is quite clever, because it makes routing easy to set up, for the ISP, that is. It gets a little bit trickier to set up on my home router though.
The following picture illustrates how 6rd works. Green lines depict
IPv6 packets and red lines depict IPv6 packets wrapped inside IPv4
packets.

Scenario 1: Assume I want to send an IPv6 packet to a destination outside the ISP's IPv6 prefix. In this case, my home router wraps the packet in an IPv4 packet and sends it a designated router of my ISP, called the 6rd Border Relay (BR). The BR then unwraps the IPv6 packet and routes it as usual.
Scenario 2: A IPv6 packet from a source outside of my ISP's IPv6 prefix is sent to me. It arrives at the BR, since it is the router for the ISP's prefix. The BR computes the IPv4 address of my home router from the destination IPv6 address. It wraps the packet in an IPv4 packet addressed to my home router, which in turn unwarps the packet and then routes it as usual.
Scenario 3: I send an IPv6 packet to a host inside the ISP's IPv6 prefix. Again, my home router wraps it in an IPv4 packet. Howerver, the BR is not involved this time. The home router directly computes the destination IPv4 address from the destination IPv6 address and sends the packet there. Upon arrival, the IPv6 address gets once again unwrapped and routed.
Note that his means that from anywhere withing the ISP's IPv4 network, I may receive an IPv4 packet which has an IPv6 packet as payload. Also, I can send an IPv4 packet with an IPv6 packet as payload to any IPv4 address in the ISPs network. Such packets never leave the ISP's IPv4 network.
6rd is described in RFC 5969. The encapsulation of IPv6 packets in IPv4 packets used by 6rd is the same as the one used by 6to4 described in RFC 4213 Section 3.5.
The header of an IPv4 packet encapsulating an IPv6 packet bears the protocol number 41. I need to configure my home router to handle packets of this protocol according to 6rd. Also, the firewall must allow incoming and outgoing IPv4 packets with this protocol number.
From OpenWRT's wiki:
6rd configuration is similar to the other tunnel protocols except that the IPv6 prefixes are automatically calculated and need not be define with ip6prefix. Make sure to ask your ISP for the correct values for
peeraddr,ip6prefix,ip6prefixlenandip4prefixlen.With these settings, the LAN interface will get automatically assigned the ::1 address from the routed-prefix and everything will just work.
peeraddr is the IPv4 address of Bluewin's dedicated router,
ip6prefix and ip6prefixlen define the first
part of our IPv6 address. ip4prefixlen indicates which
part of the IPv4 address is included in the IPv6 address. All this
information we must get from Bluewin. Let's start the odyssee.
Note that Bluewin is actually Swisscom (don't mind the mess). Of course, Swisscom doesn't like to hand out the information required for a connection, after all, they want us to use their own routers. Whatever. I will contact Swisscom support later to ask all that, but for now, I will use the information gathered from blinkenlights. Indeed
urs@speedy:~$ dig 6rd.bluewin.ch
> DiG 9.8.4-P1 <<>> 6rd.bluewin.ch
;; global options: +cmd
;; Got answer:
;; ->>HEADER<<- opcode: QUERY, status: NOERROR, id: 3762
;; flags: qr rd ra; QUERY: 1, ANSWER: 1, AUTHORITY: 0, ADDITIONAL: 0

;; QUESTION SECTION:
;6rd.bluewin.ch.                        IN      A

;; ANSWER SECTION:
6rd.bluewin.ch.         43200   IN      A       193.5.122.254

;; Query time: 12 msec
;; SERVER: 192.168.0.1#53(192.168.0.1)
;; WHEN: Mon Feb  4 17:42:18 2013
;; MSG SIZE  rcvd: 48
]]>
urs@speedy:~$ dig 6rd.swisscom.com
> DiG 9.8.4-P1 <<>> 6rd.swisscom.com
;; global options: +cmd
;; Got answer:
;; ->>HEADER<<- opcode: QUERY, status: NOERROR, id: 44738
;; flags: qr rd ra; QUERY: 1, ANSWER: 1, AUTHORITY: 0, ADDITIONAL: 0

;; QUESTION SECTION:
;6rd.swisscom.com.              IN      A

;; ANSWER SECTION:
6rd.swisscom.com.       73483   IN      A       193.5.122.254

;; Query time: 11 msec
;; SERVER: 192.168.0.1#53(192.168.0.1)
;; WHEN: Mon Feb  4 17:42:38 2013
;; MSG SIZE  rcvd: 50
]]>
This is the IP of the dedicated router for 6rd. According to
Blinkenlights, the prefix is 2a02:1200::/28. The IPv4
prefix length is not explicitely given, so I assume 0, which I think
means that the whole IPv4 address is included in the IPv6
address.
| Field | Value |
|---|---|
| peeraddr | 193.5.122.254 |
| ip6prefix | 2a02:1200:: |
| ip6prefixlen | 28 |
| ip4prefixlen | 0 |
IPv6 Essentials lists kmod-ipv6, radvd, ip, kmod-ip6tables, and ip6tabes. (Don't look into the OpenWRT IPv6 Howto, it's wrong at the time of writing.) Unfortunately, kmod-ip6tables and ip6tables are missing from Carambola's repository. It seems, we have to compile it ourselves. (Note that one could use OpenWRT's repository instead, however the Carambola has bleeding edge firmware. Of course, OpenWRT continue development without the Carambola developers keeping up and are therefore already using a newer Kernel. Clearly, one can not install a kernel module of a different kernel version most of the time.)
At this point I compile the missing packages. This is described in the Cookbook.
Now I have in bin/ramips/packages the successfully
compiled packages. In order to upload them to the Carambola, I install
the debian package openssh-server on my laptopt such that
I can fetch it from carambola using scp.
root@OpenWrt:~# ls
good       new1       old        opkg.conf
root@OpenWrt:~# mkdir manual_packages
root@OpenWrt:~# cd manual_packages/
root@OpenWrt:~/manual_packages# scp urs@192.168.0.11:/home/urs/carambola/bin/ramips/packages/ip6tables_1.4.10-4_ramips.ipk .

root@OpenWrt:~/manual_packages# scp urs@192.168.0.11:/home/urs/carambola/bin/ramips/packages/kmod-ip6tables_3.3.8-1_ramips.ipk .
urs@192.168.0.11's password:
kmod-ip6tables_3.3.8-1_ramips.ipk
root@OpenWrt:~/manual_packages# scp urs@192.168.0.11:/home/urs/carambola/bin/ramips/packages/kmod-ipv6_3.3.8-1_ramips.ipk .
Install the packages:
root@OpenWrt:~# opkg install kmod-ipv6 radvd
Already, I encounter the first problem. It seems that the kernel from the Carambola repository is not exactly the same kernel as mine. The version number is the same, but not the checksum, as it seems. Let's try with force. I also install my own modules with force, where requried.
root@OpenWrt:~# opkg --force-depends install kmod-ipv6
Package kmod-ipv6 (3.3.8-1) installed in root is up to date.
root@OpenWrt:~# lsmod | grep ipv6
ipv6                  226688  8
It installed anyway? Now I am confused. Anyway, as can be seen, the
packages ip6tables and kmod-ip6tables are
missing from the repository:
root@OpenWrt:~# opkg install ip6tables
Unknown package 'ip6tables'.
Collected errors:
 * opkg_install_cmd: Cannot install package ip6tables.
root@OpenWrt:~# opkg install kmod-ip6tables
Unknown package 'kmod-ip6tables'.
Collected errors:
 * opkg_install_cmd: Cannot install package kmod-ip6tables.
Therefore, I use my own:
root@OpenWrt:~# opkg install manual_packages/kmod-ip6tables_3.3.8-1_ramips.ipk

root@OpenWrt:~# opkg install --force-depends manual_packages/kmod-ip6tables_3.3.8-1_ramips.ipk

root@OpenWrt:~# opkg install manual_packages/ip6tables_1.4.10-4_ramips.ipk
Indeed, it is smart to always try without force first. A check is in order:
root@OpenWrt:~# lsmod | grep ip

root@OpenWrt:~# which ip6tables
/usr/sbin/ip6tables
root@OpenWrt:~# which radvd
/usr/sbin/radvd
Modules loaded, binaries found, kernel not yet crashed, sweat cleaned from face. Does it boot again? Who knows, I try it.
It does! But what did the configuration do?
root@OpenWrt:~# ifconfig

root@OpenWrt:~# lsmod | grep ip

root@OpenWrt:~# iptables -S

root@OpenWrt:~# ip6tables -S
Excellent! Even the firewall inserted its ip6tables rules.
Still missing however, is the module for r6!
root@OpenWrt:/etc/config# opkg update

root@OpenWrt:/etc/config# opkg list | grep 6rd

root@OpenWrt:/etc/config# opkg install 6rd

root@OpenWrt:/etc/config# opkg --force-depends install 6rd
After some checks and a restart, everything seems in order. Time to do the configuration!
It is again time to dive into /etc/config/network. The
new one looks like this:
option ip6assign 64config interface '6rd'
	option proto	'6rd'
	option peeraddr	'193.5.122.254'
	option ip6prefix	'2a02:1200::'
	option ip6prefixlen	'28'
	option ip4prefixlen	'0'
Restarting network and firewall indeed yields a global IPv6 address! Hurray!
root@OpenWrt:/etc/config# /etc/init.d/network restart
'radio0' is disabled
'radio0' is disabled
'radio0' is disabled
root@OpenWrt:/etc/config# /etc/init.d/firewall restart
Loading defaults
Loading synflood protection
Adding custom chains
Loading zones
Loading forwardings
Loading rules
Loading redirects
Loading includes
Optimizing conntrack
Loading interfaces
ip6tables: No chain/target/match by that name.
root@OpenWrt:/etc/config# ifconfig

root@OpenWrt:/etc/config# cat network

root@OpenWrt:/etc/config# ip6tables -S
I leave auditing the ip6tables for later. Note that the lan interface does not get a global IPv6 adress as I expected it. It seems, that the ip6assign option does not do what it should:
root@OpenWrt:/etc/config# ifconfig
I need to make sure that the global address from 6rd is assigned to
the lan interface, but with prefix length 64. I don't know what the
right way to do this should be. Clearly, the option
ip6assign should take care of this, but in this version
of OpenWRT it does not yet exist. Therefore I should write a script
which assigns the IP and it must be called whenever the 6rd interface
gets a global IP address. For now, I do it manually: Everytime rd6
gets a global IPv6 address, I run manually (using the correct IPv6
address, of course)
root@OpenWrt:/etc/config# ifconfig br-lan add 2a02:1205:34f0:e940::1/64
This must be done at least every time the network is restarted.
Let's do a test to a site available over IPv6
root@OpenWrt:/etc/config# ping6 www.swissipv6council.ch
The DNS server also works, tested from my laptop:
urs@digikal:~$ dig www.swissipv6council.ch AAAA
> DiG 9.8.1-P1 <<>> www.swissipv6council.ch AAAA
;; global options: +cmd
;; Got answer:
;; ->>HEADER<<- opcode: QUERY, status: NOERROR, id: 28240
;; flags: qr rd ra; QUERY: 1, ANSWER: 2, AUTHORITY: 0, ADDITIONAL: 0

;; QUESTION SECTION:
;www.swissipv6council.ch.	IN	AAAA

;; ANSWER SECTION:
www.swissipv6council.ch. 18557	IN	CNAME	saga.interway.ch.
saga.interway.ch.	64852	IN	AAAA	2001:8e0:40:304::8

;; Query time: 12 msec
;; SERVER: 192.168.0.1#53(192.168.0.1)
;; WHEN: Tue Feb  5 15:39:37 2013
;; MSG SIZE  rcvd: 97
]]>
radvd is the router advertisment daemon. It provides a way to set
up addresses in IPv6 networks. Of course I will use radvd to
configure IPv6 addresses in my network too. OpenWRT's
UCI radvd
documentation describes how to configure radvd using
/etc/config/radvd. This basically amounts to removing
some ignore options from the existing configuration file. The new file
looks like this:
config interface
        option interface        'lan'
        option AdvSendAdvert    1
        option AdvManagedFlag   0
        option AdvOtherConfigFlag 0
        list client             ''
        option ignore           0

config prefix
        option interface        'lan'
        # If not specified, a non-link-local prefix of the interface is used
        list prefix             ''
        option AdvOnLink        1
        option AdvAutonomous    1
        option AdvRouterAddr    0
        option ignore           0

config route
        option interface        'lan'
        list prefix             ''
        option ignore           1

config rdnss
        option interface        'lan'
        # If not specified, the link-local address of the interface is used
        list addr               ''
        option ignore           1

config dnssl
        option interface        'lan'
        list suffix             ''
        option ignore           1
Restarting radvd with /etc/init.d/radvd restart makes
the changes active. On my Laptop:
root@digikal:/home/urs# ifconfig eth0 down
root@digikal:/home/urs# ifconfig eth0 up
root@digikal:/home/urs# ifconfig eth0
Indeed, a global IPv6 address gets allocated. (Compare with the MAC address of the interface!) Let's take a look at the routes:
root@digikal:/home/urs# route -A inet6
root@OpenWrt:/etc/config# route -A inet6
Of course, to get routing from the LAN into the WAN and vice versa,
the firewall must be configured accordingly. As the new interface 6rd
also is a WAN interface, I need to add it to the wan zone in the
firewall. This means that all iptable rules previously generarted for
wan will also be generated for 6rd. The first part of the new
/etc/config/firewall:
config defaults
	option syn_flood	1
	option input		ACCEPT
	option output		ACCEPT
	option forward		REJECT
# Uncomment this line to disable ipv6 rules
#	option disable_ipv6	1

config zone
	option name		lan
	option network		'lan'
	option input		ACCEPT
	option output		ACCEPT
	option forward		REJECT

config zone
	option name		wan
	option network		'wan 6rd'
	option input		REJECT
	option output		ACCEPT
	option forward		REJECT
	option conntrack	1
	option masq		1
	option mtu_fix		1

config forwarding
	option src		lan
	option dest		wan

...
I also added the option conntrack to the wan zone. This
is required because we only forward in one direction, from lan to wan.
We want packages corresponding to already exising connections to be
routed from wan to lan, this is done by conntrack. Note that the
option masq activates conntrack automatically. But
masq only applies to IPv4 and therefore might not
activate conntrack for IPv6. (It seems to activate it, but I like to
be shure.)
Note that various predefined rules further down in this file make shure to allow important ICMP packets.
It works now:
urs@digikal:~$ ping6 -n google.com
PING google.com(2a00:1450:4002:802::1005) 56 data bytes
64 bytes from 2a00:1450:4002:802::1005: icmp_seq=1 ttl=56 time=21.7 ms
64 bytes from 2a00:1450:4002:802::1005: icmp_seq=2 ttl=56 time=21.3 ms
64 bytes from 2a00:1450:4002:802::1005: icmp_seq=3 ttl=56 time=21.2 ms
64 bytes from 2a00:1450:4002:802::1005: icmp_seq=4 ttl=56 time=21.8 ms

urs@digikal:~$ traceroute6 -n google.com
traceroute to google.com (2a00:1450:4002:803::1004), 30 hops max, 80 byte packets
 1  2a02:1205:34f0:e940::1  1.045 ms  1.302 ms  1.606 ms
 2  2001:918:10b::8  17.768 ms  19.739 ms  21.174 ms
 3  2001:918:100:10b::1  23.664 ms  25.063 ms  26.992 ms
 4  2001:918:100:3::1  31.153 ms  33.616 ms  35.226 ms
 5  2001:918:100:d::1  35.421 ms  37.203 ms  38.959 ms
 6  2001:4860:1:1:0:ce7:0:4  41.405 ms  42.504 ms  44.441 ms
 7  2001:4860::1:0:458d  50.558 ms  35.949 ms  35.613 ms
 8  2001:4860:0:1::207  36.269 ms  35.674 ms  37.010 ms
 9  2a00:1450:8000:1::4  60.402 ms  57.108 ms  55.688 ms

urs@digikal:~$ wget http://google.com/
                                                                                                                ] 14'034      --.-K/s   in 0.04s

2013-02-05 21:44:31 (325 KB/s) - »»index.html«« gespeichert [14034]
]]>
And the obligatory Knoppix:
urs@digikal:~$ wget ftp://mirror.switch.ch/mirror/knoppix/KNOPPIX_V7.0.5CD-2012-12-21-DE.iso
 »KNOPPIX_V7.0.5CD-2012-12-21-DE.iso.1«
Auflösen des Hostnamen »mirror.switch.ch (mirror.switch.ch)«... 2001:620:0:8::20, 130.59.10.36
Verbindungsaufbau zu mirror.switch.ch (mirror.switch.ch)|2001:620:0:8::20|:21... verbunden.
Anmelden als anonymous ... Angemeldet!
==> SYST ... fertig.    ==> PWD ... fertig.
==> TYPE I ... fertig.  ==> CWD (1) /mirror/knoppix ... fertig.
==> SIZE KNOPPIX_V7.0.5CD-2012-12-21-DE.iso ... 731115520
==> EPSV ... fertig.    ==> RETR KNOPPIX_V7.0.5CD-2012-12-21-DE.iso ... fertig.
Länge: 731115520 (697M) (unmaßgeblich)

100%[====================================================>] 731'115'520  487K/s   in 24m 49s

2013-02-05 22:10:57 (479 KB/s) - »»KNOPPIX_V7.0.5CD-2012-12-21-DE.iso.1«« gespeichert [731115520]
]]>
As you can see, the bandwidth is not what one would like to have. Why this is so remains unclear for the moment. There might be various reasons. Likely, it is because 6rd adds another layer of encapsulation.
Interestingly, the current firewall configuration works for outbound connections despite the fact that I forgot to allow protocol 41 for IPv4: If someone wants to send an IPv6 packet (say, sending a ping) from a host inside the ISP's prefix, then it fails. But when I send pings to this host while it is sending pings to me, it suddenly starts to work. This is a case of IPv4 connection tracking hiding the effects from a missconfigured firewall. In order to understand this, one must remember that thanks to 6rd, the IPv6 packets arrive inside IPv4 packets addressed to the router. Therefore, the firewall must allow these inbound packets. This is not yet the case in my firewall configuration. The firewall allows already the outbound packets and as soon as outbound packets have been sent to some IPv4 address, the packets originating from there are allowed inbound due to connection tracking.
So, what remains to be done is to allow IPv4 packets for 6rd
inbound and outbound. As mentioned before, these packets have a
protocol number of 41. I have to tell the firewall that packets from
and to the interface wan with protocol number 41 are to be accepted.
(Note that there are no ports involved. Ports are something introduced
by TCP and UDP and are not part of the IP header nor of protocol 41.)
For this, I write the following new firewall rules to
/etc/config/firewall:
# Handling 6rd traffic

config rule
	option name		Allow-6rd-input
	option src		wan
	option proto		41
	option family		ipv4
	option target		ACCEPT

config rule
	option name		Allow-6rd-output
	option dest		wan
	option proto		41
	option family		ipv4
	option target		ACCEPT

config rule
	option name		Disallow-ipv6encap-forward
	option src		*
	option dest		*
	option proto		41
	option family		ipv4
	option target		REJECT
The rules Allow-6rd-input and
Allow-6rd-output accept all packets from the router to
wan and vice versa. The rule Disallow-ipv6encap-forward
rejcts the forwarding of all packets which have IPv6 packets
encapsulated, i.e. which have protocol 41. The third rule is
important, because I don't want anyone in my network mess with my 6rd
connectivity.
This change to the firewall rules is reflected in the following iptables rules (unrelated rules omitted):
root@OpenWrt:/etc/config# iptables -S
...
-A INPUT -m conntrack --ctstate RELATED,ESTABLISHED -j ACCEPT
-A INPUT -i lo -j ACCEPT
-A INPUT -p tcp -m tcp --tcp-flags FIN,SYN,RST,ACK SYN -j syn_flood
-A INPUT -j input_rule
-A INPUT -j input
-A FORWARD -m conntrack --ctstate RELATED,ESTABLISHED -j ACCEPT
-A FORWARD -j forwarding_rule
-A FORWARD -j forward
-A FORWARD -j reject
-A OUTPUT -m conntrack --ctstate RELATED,ESTABLISHED -j ACCEPT
-A OUTPUT -o lo -j ACCEPT
-A OUTPUT -j output_rule
-A OUTPUT -j output
-A forward -p ipv6 -j reject
-A forward -i br-lan -j zone_lan_forward
-A forward -i pppoe-wan -j zone_wan_forward
-A forward -i 6rd-6rd -j zone_wan_forward
-A forwarding_rule -j nat_reflection_fwd
-A input -p ipv6 -j zone_wan_ACCEPT
-A input -i br-lan -j zone_lan
-A input -i pppoe-wan -j zone_wan
-A input -i 6rd-6rd -j zone_wan
...
-A output -j zone_lan_ACCEPT
-A output -j zone_wan_ACCEPT
The protocol number 41 is called ipv6 in these rules. (one could also
use ipv6 name in /etc/config/firewall
instead of 41.)
Note that the rule for outbound 6rd traffic has been omitted. It is
redundant since outbound traffic is allowed in any case.
It remains to tackle the problem of assigning 6rd's IPv6 address to
the local interface. How to do this, we know from above. The question
is now, when this should be done. Clearly, everytime 6rd receives a
new gloval IPv6 address, it must happen, but when, or better, where
does this happen? A better solution than the one presented here is is
probably to use /etc/hotplug.d/iface/. But I found out
about this too late.
Clearly, OpenWRT must be able to act on changes to the network, like links coming up or going down. Indeed, it uses netifd to manage interfaces and ubus to communicate events.
netifd reads the configuration /etc/config/network and
configures the interfaces once they come up. An interface coming up
(say, wan) can cause netifd to activate other interfaces (say, 6rd).
Everytime it makes a change it signals an event over ubus. It is also
listening to ubus for events.
ubus is a communication daemon. It plays a similar role as dbus
does on many systems, but it is much (much!) more lightweight. ubus
communicates all events it is informed about to everyone who is
listening to it. One can connect to ubus via the command
ubus listen, via Lua or, of course via C code.
To try this, I disconnect my router from the modem, but I connect
it to my laptop. Then I login into the router and execute
. This starts an application
which connects to ubus and writes data about every
event to the standard output. Then I connect my router to the modem
and hope that wan and 6rd come up and ubus informs me about this.
Indeed:
{ "network.interface": { "action": "ifup", "interface": "wan" } }
{ "network.interface": { "action": "ifup", "interface": "6rd" } }
You clearly can see that the interface wan comes up and that then netifd concludes that it can activate the interface 6rd.
When 6rd comes up, it is time for me to react. Note that 6rd knows the IPv6 address immediately when the interface comes up, since it is computed algorithmically from wan's IPv4 address. Therefore, whenever this event happens, we can immediately read out the IPv6 address of 6rd.
Determining the correct IPv6 address turns out to be tricky. One could ask ifconfig, but this is not a proper way. The proper way is to ask netifd. This is also done via ubus:
root@OpenWrt:~# ubus call network.interface.6rd status
There it is!
The last step is to set the IPv6 address on the lan interface. This
could easily be done using ifconfig. But this is also not what one
should do. Another way is to update the network configuration file and
tell netifd to reload it. This is most reliably done with the command
uci and then calling network reload via
ubus. (Note that netifd's reload
only makes the changes required to reach the state given by the
new configuration file.)
In order to realize this, one probably does not want to use shell
scripts. Instead, one should note that there is a ubus binding for
lua, a lightweight programming language. The
techref about
ubus merely hints at how to use ubus with lua. Lua has an
interesting property for newcomers: Often one does not even recognize
Lua, but one has the feeling that there is a special syntax just for
the special purpose. Lua scripts do not need to be compiled and can be
run with the command lua.
First, I write a small Lua script
/root/myip6updated.lua which gives me some information
about what I can do with ubus (list of procedures and there arguemnts)
and which outputs some information about the 6rd interface. This
script is just for my information and to get used to lua, it won't be
used later on:
Running it gives:
root@OpenWrt:~# lua myip6updated.lua
Fiddling around with some prints and loops over pairs generated from
tables, I learn that the status of network.interface.6rd is a table,
contains a "ipv6-address" which itself is a table. It contains all
IPv6 addresses with numbers as keys. (A table with keys 1, 2, 3 and so
on is the Lua-equivalent of an array.) Note that an interface can have
more than one IPv6 address. In this case however, netifd only reports
the important one, so I can access it via the key 1. This
yields finally a table containing an entry mask and an
entry address. Computing the IPv6 address for lan works
as follows (/root/myip6updated.lua):
Running it gives:
root@OpenWrt:~# lua myip6updated.lua
myip6updated: 6rd up with address 2a02:1203:ecb9:8e60::1/28
myip6updated: using 2a02:1203:ecb9:8e60::1/64 for lan
This seems not tricky at all.
More tricky is to wait for events. Unfortunately, the ubus bindings
for Lua do not include a way to listen for events. To do this, one
could open a pipe in order to read from ubus listen.
Unfortunately to no avail. It seems that the pipe has somewhere a
buffer which does not flush at the end of every line, but after a
certain too large amount of bytes. The only way I see out of this
problem is writing my own C application using liububus.
Note that I compiled the Carambola firmware before, so the
buildsystem including libraries is in place. I have everything in the
build directory /mnt/build. Therein, the directory
carambola/build_dir/target-mipsel_r2_uClibc-0.9.33.2/ubus-2012-06-01
is of interest. Right there is a ubus-example.c. I
modify this application such that it does what I need. (Yes, I use
such a hack because I don't want to spend time on learning the build
system.) Then make compiles it with the ramips compiler.
The compiled ubus-example is what I need. I copy it with
scp to my laptop and grab it with scp from my Carambola (I know,
redundancy). Running it from the carambola tells me that it works.
Here the ubus-example.c:
#include "libubus.h"


static void receive_event(struct ubus_context *ctx, struct ubus_event_handler *ev,
			  const char *type, struct blob_attr *msg)
{
        system("/root/ip6update");
}

static int listen(struct ubus_context *ctx)
{
	static struct ubus_event_handler listener;
	const char *event;
	int ret = 0;

	memset(&listener, 0, sizeof(listener));
	listener.cb = receive_event;

        event = "network.interface";
        //event = "*";

        ret = ubus_register_event_handler(ctx, &listener, event);

	if (ret) {
		fprintf(stderr, "myip6updated: Error while registering for event '%s': %s\n",
			event, ubus_strerror(ret));
		return -1;
	}

	uloop_init();
	ubus_add_uloop(ctx);
	uloop_run();
	uloop_done();

	return 0;
}


int main(int argc, char **argv)
{
	const char *ubus_socket = NULL;
	static struct ubus_context *ctx;
	int ret = 0;

        system("/root/ip6update");

	ctx = ubus_connect(ubus_socket);
	if (!ctx) {
                fprintf(stderr, "myip6updated: Failed to connect to ubus\n");
	}

        ret = listen(ctx);

	ubus_free(ctx);
	return ret;
}

]]>
It simply waits for an ubus event called
network.interface and then runs the Lua application
/root/ip6update which I will write shortly.
(Note that when starting, ip6update is called immediately to catch up
if the interfaces are already up.) Fetching the
file from my laptop:
root@OpenWrt:~# scp urs@192.168.0.11:/home/urs/carambola/ubus-example .
Then I write the following Lua script to
/root/ip6update:
It has to be executable (chmod 755 ip6update). It does
all the hard work: It looks up the ipv6 addresses of 6rd, computes the
new address for lan and compares with the currently configured one.
If the address of lan has to be updated, it uses the command line tool
uci to update the configuration file and then tells netifd to reload
the configuration. It also tells radvd to reload, because it did not
pick up the address itself in my tests.
The last step is to make shure that myip6updated gets started at
bootup. For this I add the following line to my
/etc/rc.local:
# IPv6 address update daemon
/root/myip6updated &
This should do the trick.
My daemon should start at the next reboot, but now I run
/etc/rc.local manually, remove the ethernet
plug from my modem, wait a while, plug it in again and wait a lot of
time. I watch the show:
root@OpenWrt:~# sh /etc/rc.local
root@OpenWrt:~#myip6updated: 6rd address not changed
myip6updated: no 6rd available yet
myip6updated: no 6rd available yet
myip6updated: Setting lan address to 2a02:1205:34e0:64c0::2/64
'radio0' is disabled
'radio0' is disabled
'radio0' is disabled
myip6updated: 6rd address not changed
myip6updated: 6rd address not changed
myip6updated: 6rd address not changed
Clearly, myip6updated should be more sofisticated. It should only react to events concerning the 6rd interface. Unfortunately, I don't know enough about libubus to do that.
The Server updates now its local interface. But the clients also
needs to be updated. This means we have to better configure radvd. I
shorten the time between advertisement as suggested in the manpage
radvd.conf(5). The
new configuration file /etc/config/radvd:
config interface
	option interface	'lan'
	option AdvSendAdvert	1
	option AdvManagedFlag	0
	option AdvOtherConfigFlag 0
	list client		''
	option ignore		0
	# IP is dynamic, update regularly
        option IgnoreIfMissing  1
	option MaxRtrAdvInterval	30
	option MinRtrAdvInterval	10

config prefix
	option interface	'lan'
	# If not specified, a non-link-local prefix of the interface is used
	list prefix		''
	option AdvOnLink	1
	option AdvAutonomous	1
	option AdvRouterAddr	0
	option ignore		0
	# IP is dynamic, update regularly
	option AdvValidLifetime	300
	option AdvPreferredLifetime	120
I don't know whether such a small value for
AdvValidLifetime makes any sense. I suspect that clients
ignore it. Also, IgnoreIfMissing is important, otherwise
radvd will exit at bootup. Also, for radvd to even start at boot, one
needs to activate it with
root@OpenWrt:/etc/config# /etc/init.d/radvd enable
After all IPv6 issues have been fixed, a final round of testing is in order. Going to test-ipv6.com is a good idea too. Also, the reliability of my update effort has yet to be shown.
The system can now go life in my network. And so it does.
In order to check that IPv6 addresses are advertised as they should, one can run:
speedy:/home/urs# ip -6 addr show eth0
 mtu 1500 qlen 1000
    inet6 2a02:1205:13f6:e9f0:225:22ff:fe41:50e7/64 scope global dynamic
       valid_lft 287sec preferred_lft 107sec
    inet6 fe80::225:22ff:fe41:50e7/64 scope link
       valid_lft forever preferred_lft forever
]]>
Note that valid_lft and preferred_lft are counting down. What I consider suspicious is that ifconfig also shows old IPv6 addresses. While it might have a reason for this, these addresses are no longer valid and will therefore not be used.
root@OpenWrt:~# opkg update
Downloading http://pkg.8devices.com/v2.3/carambola/packages/Packages.gz.
Inflating http://pkg.8devices.com/v2.3/carambola/packages/Packages.gz.
Updated list of available packages in /var/opkg-lists/snapshots.
root@OpenWrt:~# opkg install ntpclient
Installing ntpclient (2007_365-4) to root...
Downloading http://pkg.8devices.com/v2.3/carambola/packages/ntpclient_2007_365-4_ramips.ipk.
Configuring ntpclient.
Modified /etc/config/ntpclient:
(Note that I use the server ch.pool.ntp.org. If you don't
live in Switzerland, you want to replace the ch with your country
code, provided there are any NTP servers from the pool in your
country.)
For those of us who consider web interafaces redundant it is now time to deactivate it.
root@OpenWrt:/etc/config# ls -1 /etc/rc.d/*luci*
/etc/rc.d/K95luci_fixtime
/etc/rc.d/S05luci_fixtime
/etc/rc.d/S49lucid
/etc/rc.d/S59luci_dhcp_migrate
root@OpenWrt:/etc/config# /etc/init.d/luci_fixtime disable
root@OpenWrt:/etc/config# /etc/init.d/lucid disable
root@OpenWrt:/etc/config# /etc/init.d/luci_dhcp_migrate disable
root@OpenWrt:/etc/config# ls -1 /etc/rc.d/*luci*
ls: /etc/rc.d/*luci*: No such file or directory
root@OpenWrt:/etc/config# /etc/init.d/uhttpd disable
netstat -nlptu shows us who listens. (n: nummeric, p:
show processes, l: show only listening sockets, p: tcp, u: udp)
root@OpenWrt:/etc/config# netstat -nlptu
Although our firewall should be configured correctly, one should
always rely on multiple layers of security. In case of the ssh server,
this would be at the moment the firewall and the ssh password. I want
to have another layer, namely that the SSH server does not listen on
WAN at all and therefore only receives requests from LAN. This can be
easily done by editing /etc/config/dropbear.
DANGER: Messing up this file could prevent one from making SSH
connections to the Carambola. Adding the line
option interface 'lan' does the trick.
config dropbear
	option PasswordAuth 'on'
	option RootPasswordAuth 'on'
	option Port         '22'
	option Interface    'lan'
#	option BannerFile   '/etc/banner'
And the effect is:
root@OpenWrt:/etc/config# netstat -nlptu
Another offender is dnsmasq. I change the dnsmasq entry in
/etc/config/dhcp like so:
config dnsmasq
        option domainneeded     1
        option boguspriv        1
        option filterwin2k      0  # enable for dial on demand
        option localise_queries 1
        option rebind_protection 1  # disable if upstream must serve RFC1918 addresses
        option rebind_localhost 1  # enable for RBL checking and similar services
        #list rebind_domain example.lan  # whitelist RFC1918 responses for domains
        option local    '/lan/'
        option domain   'lan'
        option expandhosts      1
        option nonegcache       0
        option authoritative    1
        option readethers       1
        option leasefile        '/tmp/dhcp.leases'
        option resolvfile       '/tmp/resolv.conf.auto'
        list interface          lan
This hopefully means that the DNS server does not serve on wan and 6rd anymore. (It still listens on all interfaces, it just doesn't serve requests on other interfaces than lan.)
eth0, eth0.2 obtain link-local IPv6 addresses automatically. Interestingly, eth0.1 does not.
root@OpenWrt:~# ifconfig
IPv6 is disabled for eth0.1
root@OpenWrt:~# sysctl -a | grep disable_ipv6
In order to permanently disable IPv6 for eth0 and eth0.2, the
following does not work: Setting disable_ipv6 for these
interfaces in /etc/sysctl.conf or
/etc/rc.local. This is because netifd activates it again
when reloading.
What is the danger? I don't understand PPPoE entirely, but it could
be that not every Ethernet packet on eth0.2 is handled by
pppd. This would mean that Swisscom could access the Carambola via the
link-local address. Unfortunately, the firewall does not block such
attempts. (There are no rules for this case and the policies are too
much in favour of ACCEPT.) Another problem is that we get spurious
entries in the IPv6 routing tables.
The best solution I can come up with is my ip6update script. I just
add two lines to /root/ip6update:
os.execute("sysctl -w net.ipv6.conf.eth0.disable_ipv6=1")
os.execute("sysctl -w net.ipv6.conf.eth0.2.disable_ipv6=1")
Note that these two lines are candidates for endless loops based on there position (they are always executed). Calling sysctl however, will not create any ubus events, so this is safe.
Solving this problem gets rid of the wrong entries in the routing table. Before I had:
root@OpenWrt:/etc/config# route -A inet6
Kernel IPv6 routing table
Destination                                 Next Hop                                Flags Metric Ref    Use Iface
::/96                                       ::                                      U     256    1        0 6rd-6rd
2a02:1205:34f0:e940::/64                    ::                                      U     256    0        0 br-lan
2a02:1200::/28                              ::                                      U     256    0        0 6rd-6rd
fe80::/64                                   ::                                      U     256    0        0 eth0
fe80::/64                                   ::                                      U     256    0        0 br-lan
fe80::/64                                   ::                                      U     256    0        0 eth0.2
fe80::/64                                   ::                                      U     256    0        0 6rd-6rd
::/0                                        ::193.5.122.254                         UG    1024   0        0 6rd-6rd
::1/128                                     ::                                      U     0      0        1 lo
::83.79.14.148/128                          ::                                      U     0      0        1 lo
2a02:1200::/128                             ::                                      U     0      0        1 lo
2a02:1205:34f0:e940::/128                   ::                                      U     0      0        1 lo
2a02:1205:34f0:e940::1/128                  ::                                      U     0      6        1 lo
2a02:1205:34f0:e940::2/128                  ::                                      U     0      4        1 lo
fe80::/128                                  ::                                      U     0      0        1 lo
fe80::/128                                  ::                                      U     0      0        1 lo
fe80::/128                                  ::                                      U     0      0        1 lo
fe80::c693:ff:fe00:d7f/128                  ::                                      U     0      0        1 lo
fe80::c693:ff:fe00:d7f/128                  ::                                      U     0      7        1 lo
fe80::c693:ff:fe00:d7f/128                  ::                                      U     0      0        1 lo
ff00::/8                                    ::                                      U     256    0        0 eth0
ff00::/8                                    ::                                      U     256    0        0 br-lan
ff00::/8                                    ::                                      U     256    0        0 eth0.2
ff00::/8                                    ::                                      U     256    0        0 6rd-6rd
After changing ip6update and rebooting (or restarting
the network) I have
root@OpenWrt:~# route -A inet6
That is, the wrong entries with Iface eth0 and eth0.2 are gone.
Since I obtain my IP address from my ISP via PPPoE and not via
DHCP, two rules from the Firewall have to be removed. I deactivate the
following rules in /etc/config/firewall:
### I don't need the following, I get my address by PPPoE
## We need to accept udp packets on port 68,
## see https://dev.openwrt.org/ticket/4108
#config rule
#       option name             Allow-DHCP-Renew
#       option src              wan
#       option proto            udp
#       option dest_port        68
#       option target           ACCEPT
#       option family           ipv4

...

### I don't need the following, I get my address by 6rd
## Allow DHCPv6 replies
## see https://dev.openwrt.org/ticket/10381
#config rule
#       option name             Allow-DHCPv6
#       option src              wan
#       option proto            udp
#       option src_ip           fe80::/10
#       option src_port         547
#       option dest_ip          fe80::/10
#       option dest_port        546
#       option family           ipv6
#       option target           ACCEPT
It is unnecessary for lan to be a bridge. Therefore
I comment out the following line in
/etc/config/network:
config interface 'lan'
        option ifname 'eth0.1'
        #option type 'bridge'
        option proto 'static'
        option ipaddr '192.168.0.1'
        option netmask '255.255.255.0'
        option macaddr 'c4:93:00:00:0d:7f'
        option ip6assign '64'
After this change, the network and all daemons must be restarted
as the physical interface name for lan changed:
/etc/init.d/network restart and
/etc/init.d/dropbear restart. If logging in is still
possible after this change, a restart makes shure that everything is
restarted.
Listed below are the new versions of the configuration files I touched up to this point. (Hint: Just dropping them into a new Carambola does not give the expected results.)
/etc/config/network
config interface 'loopback'
	option ifname 'lo'
	option proto 'static'
	option ipaddr '127.0.0.1'
	option netmask '255.0.0.0'

config interface 'lan'
	option ifname 'eth0.1'
	#option type 'bridge'
	option proto 'static'
	option ipaddr '192.168.0.1'
	option netmask '255.255.255.0'
	option macaddr 'c4:93:00:00:0d:7f'
	option ip6assign 64

config interface 'wan'
	option ifname	'eth0.2'
	option proto	'pppoe'
	option username	'u.holzer@bluewin.ch'
	option password	'gro.mulmul.89'
	#option demand	'3600'

config interface '6rd'
	option proto	'6rd'
	option peeraddr	'193.5.122.254'
	option ip6prefix	'2a02:1200::'
	option ip6prefixlen	'28'
	option ip4prefixlen	'0'

config switch
	option name 'rt305x'
	option reset '1'
	option enable_vlan '1'

config switch_vlan
	option device 'rt305x'
	option vlan '1'
	option ports '1 2 3 4  6t'

config switch_vlan
	option device 'rt305x'
	option vlan '2'
	option ports '0  6t'
/etc/config/firewall
config defaults
	option syn_flood	1
	option input		ACCEPT
	option output		ACCEPT
	option forward		REJECT
# Uncomment this line to disable ipv6 rules
#	option disable_ipv6	1

config zone
	option name		lan
	option network		'lan'
	option input		ACCEPT
	option output		ACCEPT
	option forward		REJECT

config zone
	option name		wan
	option network		'wan 6rd'
	option input		REJECT
	option output		ACCEPT
	option forward		REJECT
	option conntrack	1
	option masq		1
	option mtu_fix		1

config forwarding
	option src		lan
	option dest		wan

# Handling 6rd traffic

config rule
	option name		Allow-6rd-input
	option src		wan
	option proto		41
	option family		ipv4
	option target		ACCEPT

config rule
	option name		Allow-6rd-output
	option dest		wan
	option proto		41
	option family		ipv4
	option target		ACCEPT

config rule
	option name		Disallow-ipv6encap-forward
	option src		*
	option dest		*
	option proto		41
	option family		ipv4
	option target		REJECT

### I don't need the following, I get my address by PPPoE
## We need to accept udp packets on port 68,
## see https://dev.openwrt.org/ticket/4108
#config rule
#       option name             Allow-DHCP-Renew
#       option src              wan
#       option proto            udp
#       option dest_port        68
#       option target           ACCEPT
#       option family           ipv4

# Allow IPv4 ping
config rule
	option name		Allow-Ping
	option src		wan
	option proto		icmp
	option icmp_type	echo-request
	option family		ipv4
	option target		ACCEPT

### I don't need the following, I get my address by 6rd
## Allow DHCPv6 replies
## see https://dev.openwrt.org/ticket/10381
#config rule
#       option name             Allow-DHCPv6
#       option src              wan
#       option proto            udp
#       option src_ip           fe80::/10
#       option src_port         547
#       option dest_ip          fe80::/10
#       option dest_port        546
#       option family           ipv6
#       option target           ACCEPT

# Allow essential incoming IPv6 ICMP traffic
config rule
	option name		Allow-ICMPv6-Input
	option src		wan
	option proto	icmp
	list icmp_type		echo-request
	list icmp_type		echo-reply
	list icmp_type		destination-unreachable
	list icmp_type		packet-too-big
	list icmp_type		time-exceeded
	list icmp_type		bad-header
	list icmp_type		unknown-header-type
	list icmp_type		router-solicitation
	list icmp_type		neighbour-solicitation
	list icmp_type		router-advertisement
	list icmp_type		neighbour-advertisement
	option limit		1000/sec
	option family		ipv6
	option target		ACCEPT

# Allow essential forwarded IPv6 ICMP traffic
config rule
	option name		Allow-ICMPv6-Forward
	option src		wan
	option dest		*
	option proto		icmp
	list icmp_type		echo-request
	list icmp_type		echo-reply
	list icmp_type		destination-unreachable
	list icmp_type		packet-too-big
	list icmp_type		time-exceeded
	list icmp_type		bad-header
	list icmp_type		unknown-header-type
	option limit		1000/sec
	option family		ipv6
	option target		ACCEPT

# include a file with users custom iptables rules
config include
	option path /etc/firewall.user
/etc/config/radvd
config interface
	option interface	'lan'
	option AdvSendAdvert	1
	option AdvManagedFlag	0
	option AdvOtherConfigFlag 0
	list client		''
	option ignore		0
	# IP is dynamic, update regularly
        option IgnoreIfMissing  1
	option MaxRtrAdvInterval	30
	option MinRtrAdvInterval	10

config prefix
	option interface	'lan'
	# If not specified, a non-link-local prefix of the interface is used
	list prefix		''
	option AdvOnLink	1
	option AdvAutonomous	1
	option AdvRouterAddr	0
	option ignore		0
	# IP is dynamic, update regularly
	option AdvValidLifetime	300
	option AdvPreferredLifetime	120

config route
	option interface	'lan'
	list prefix		''
	option ignore		1

config rdnss
	option interface	'lan'
	# If not specified, the link-local address of the interface is used
	list addr		''
	option ignore		1

config dnssl
	option interface	'lan'
	list suffix		''
	option ignore		1
/etc/config/ntpclient
config ntpserver
        option hostname 'ch.pool.ntp.org'

config ntpdrift
        option freq     '0'

config ntpclient
        option interval 36000
        #option count   10
        option interface wan
/etc/config/dropbear
config dropbear
	option PasswordAuth 'on'
	option RootPasswordAuth 'on'
	option Port         '22'
	option Interface    'lan'
#	option BannerFile   '/etc/banner'
/etc/config/dhcp
config dnsmasq
        option domainneeded     1
        option boguspriv        1
        option filterwin2k      0  # enable for dial on demand
        option localise_queries 1
        option rebind_protection 1  # disable if upstream must serve RFC1918 addresses
        option rebind_localhost 1  # enable for RBL checking and similar services
        #list rebind_domain example.lan  # whitelist RFC1918 responses for domains
        option local    '/lan/'
        option domain   'lan'
        option expandhosts      1
        option nonegcache       0
        option authoritative    1
        option readethers       1
        option leasefile        '/tmp/dhcp.leases'
        option resolvfile       '/tmp/resolv.conf.auto'
        list interface          lan

config dhcp lan
	option interface	lan
	option start 	100
	option limit	150
	option leasetime	12h

config dhcp wan
	option interface	wan
	option ignore	1

config host
	option ip	'192.168.0.10'
	option mac	'00:25:22:41:50:e7'
	option name	'speedy'

config host
	option ip	'192.168.0.11'
	option mac	'00:26:2d:f8:f4:6d'
	option name	'digikal'
/etc/rc.local
/root/ip6update
#!/usr/bin/lua

require "ubus"

os.execute("sleep 2")

local conn = ubus.connect()
if not conn then
  error("Failed to connect to ubusd")
end

os.execute("sysctl -w net.ipv6.conf.eth0.disable_ipv6=1")
os.execute("sysctl -w net.ipv6.conf.eth0.2.disable_ipv6=1")

local rdstate = conn:call("network.interface.6rd", "status", {})
local rdaddress = rdstate["ipv6-address"]

local lanstate = conn:call("network.interface.lan", "status", {})
local lanaddress = lanstate["ipv6-address"]

if rdaddress == nil then
  print("myip6updated: no 6rd available yet")
  conn:close()
  os.exit(0)
end

newaddress = string.sub(rdaddress[1].address,1,-2) .. "2"
newmask = 64

if lanaddress == nil then
  print("myip6updated: no lan available yet")
  conn:close()
  os.exit(0)
end

if (not lanaddress[1]) or not (lanaddress[1].address == newaddress) then
  print("myip6updated: Setting lan address to " .. newaddress .. "/" .. newmask)
  os.execute("uci set network.lan.ip6addr=" .. newaddress .. "/" .. newmask)
  os.execute("uci commit")
  os.execute("/etc/init.d/network reload")
  os.execute("/etc/init.d/radvd reload")
  os.execute("sleep 8")
else
  print("myip6updated: 6rd address not changed")
end

conn:close()

os.execute("sleep 2")
In this part you find topics going beyond the basic setup. They can be tackled in any order. Due to different configurations, configuration files and the output of commands may not look the same here as they do in your case, even if you work through this document linearly. They have been added by the authors anytime an issue turned up and needed solving.
In this section, I build the kernel modules
kmod-ip6tables and ip6tables as an example.
First, I clone the git repository from 8devices.
urs@speedy:~/p/carambola/buildenv$ git clone https://github.com/8devices/carambola.git
Cloning into 'carambola'...
remote: Counting objects: 213449, done.
remote: Compressing objects: 100% (63084/63084), done.
remote: Total 213449 (delta 140745), reused 211079 (delta 139384)
Receiving objects: 100% (213449/213449), 91.41 MiB | 110 KiB/s, done.
Resolving deltas: 100% (140745/140745), done.
urs@speedy:~/p/carambola/buildenv$ cd carambola/
It is important to check out exactly the same version of the carambola
software as is currently on the Carambola installed. Especially
when compiling kernel modules one has to make shure to compile
them for exactly the same kernel version. In my case, I
have to check out the revision with the tag
carambola/v2.3-rc4. (How to find out which one of the
tags corresponds to the software installed on the Carambola is an
exercise for the reader, i.e. I don't know how.)
urs@speedy:~/p/carambola/buildenv/carambola$ git tag
carambola/v1.0
carambola/v1.1
carambola/v1.1-rc1
carambola/v2.0
carambola/v2.0-rc1
carambola/v2.1
carambola/v2.1-rc1
carambola/v2.1-rc2
carambola/v2.2-rc1
carambola/v2.3-rc1
carambola/v2.3-rc2
carambola/v2.3-rc3
carambola/v2.3-rc4
urs@speedy:~/p/carambola/buildenv/carambola$ git checkout carambola/v2.3-rc4
Note: checking out 'carambola/v2.3-rc4'.

You are in 'detached HEAD' state. You can look around, make experimental
changes and commit them, and you can discard any commits you make in this
state without impacting any branches by performing another checkout.

If you want to create a new branch to retain commits you create, you may
do so (now or later) by using -b with the checkout command again. Example:

  git checkout -b new_branch_name

HEAD is now at 1aeb75b... Set default txpower to 10 dBm in detect_mac80211()
It is good idea to read the README file in this directory. The next
steps are also described on
8devices' Wiki.
I skip the step "More packages" mentioned there. (In fact, I don't
recommend running it, I couldn't compile after doing so.) So I continue with
make menuconfig. It allows one to configure the kernel
and to choose the OpenWRT modules to be compiled.
urs@speedy:~/p/carambola/buildenv/carambola$ make menuconfig
Calling this, a lot of stuff happens, and then, a curses menu appears. (Thanks to the textual nature of terminals, I can show you the menu as preformatted text instead of an image.)
selects submenus --->. │ │ Highlighted letters are hotkeys. Pressingincludes, excludes, │ │ builds as package. Press to exit, for Help, │ │ for Search. Legend: [*] built-in [ ] excluded package < > │ │ ┌─────────────────────────────────────────────────────────────────────┐ │ │ │ Target System (Ralink RT288x/RT3xxx) ---> │ │ │ │ Subtarget (RT305x based boards) ---> │ │ │ │ Target Profile (Carambola profile) ---> │ │ │ │ Target Images ---> │ │ │ │ Global build settings ---> │ │ │ │ [*] Advanced configuration options (for developers) ---> │ │ │ │ [ ] Build the OpenWrt Image Builder │ │ │ │ [ ] Build the OpenWrt SDK │ │ │ │ [ ] Build the OpenWrt based Toolchain │ │ │ │ [ ] Image configuration ---> │ │ │ │ Base system ---> │ │ │ └─v(+)────────────────────────────────────────────────────────────────┘ │ ├─────────────────────────────────────────────────────────────────────────┤ │
Now finding the relevant modules:
ip6table:
IPv6 ---> Firewall --->
then on ip6tables press m
kmod-ipv6:
Kernel modules ---> Netfilter Extensions --->
then on kmod-ip6tables press m.
(Note: This is a dependency of ip6tables and therefore
already has an m if ip6table has been selected before.)
Now I exit and confirm that I want to save the changes. The
configuration is saved to the file .config.
Now I must start the compilation. This is done (as expected) with a
simple make. It is interesting to note what it does: It
downloads further sources, build a complete cross-compile toolchain
and then builds the kernel and the modules! For natural and completely
obvious reasons, this takes a loooooong time.
urs@speedy:~/p/carambola/buildenv/carambola$ make
...
This already is it. The compiled packages can now be found in
bin/ramips/packages. Other packages can be compiled
analogously.
Of course, one wants to host public servers. For this, the router must forward connection requests. For IPv6, this is easily done by telling the firewall to allow the connection, as every host has its own IPv6 address. For IPv4, one has to use the right mix of network address translation (NAT). Both should be easily configurable with UCI
For example, I want to redirect connections to my router from the
outside to 192.168.0.10, but only those for ports where Linphone (a
VoIP client) listens. I add the following entries to
/etc/config/firewall:
This gives me the following iptable rules:
root@OpenWrt:/etc/config# /etc/init.d/firewall reload

root@OpenWrt:/etc/config# iptables -S

root@OpenWrt:/etc/config# iptables -t nat -S
It should work now.
For IPv6, one does not use NAT, since every host on the network has its own IPv6 address. One only needs to tell the firewall which connections to which hosts are allowed. A subtlety is that I have a dynamic IPv6 address prefix: I need to tell the firewall that this prefix doesn't matter. This is done by the netmask. It is a bitmask of the same size as an IPv6 address and tells which bit of the address are relevant.
Here I choose the netmask ::ffff:ffff:ffff:ffff. It
basically says, that only the host part (last 64 bit) are significant.
Another option would be :f:ffff:ffff:ffff:ffff, because
the router controls a network with an address prefixlength of
28 + 32 = 60 bit. (Remember: Swisscom's 6rd prefix has length 28 and
the IPv4 address included in the 6rd address consists of 32 bit.) This
is a good idea if one manages multiple subnetworks.
I introduce the following rules:
# IPv6 rules for Linphone

config rule
        option src              wan
        option dest             lan
        option dest_ip          ::225:22ff:fe41:50e7/::ffff:ffff:ffff:ffff
        option dest_port        5060
        option proto            tcpudp
        option family           ipv6
        option target           ACCEPT

config rule
        option src              wan
        option dest             lan
        option dest_ip          ::225:22ff:fe41:50e7/::ffff:ffff:ffff:ffff
        option dest_port        7078
        option proto            udp
        option family           ipv6
        option target           ACCEPT

config rule
        option src              wan
        option dest             lan
        option dest_ip          ::225:22ff:fe41:50e7/::ffff:ffff:ffff:ffff
        option dest_port        9078
        option proto            udp
        option family           ipv6
        option target           ACCEPT
And the new ip6tables look like
root@OpenWrt:/etc/config# ip6tables -S

-A zone_wan_forward -d ::225:22ff:fe41:50e7/::ffff:ffff:ffff:ffff -p tcp -m tcp --dport 5060 -j zone_lan_ACCEPT
-A zone_wan_forward -d ::225:22ff:fe41:50e7/::ffff:ffff:ffff:ffff -p udp -m udp --dport 5060 -j zone_lan_ACCEPT
-A zone_wan_forward -d ::225:22ff:fe41:50e7/::ffff:ffff:ffff:ffff -p udp -m udp --dport 7078 -j zone_lan_ACCEPT
-A zone_wan_forward -d ::225:22ff:fe41:50e7/::ffff:ffff:ffff:ffff -p udp -m udp --dport 9078 -j zone_lan_ACCEPT
If you have a slow network, or more importantly, a slow one on one interface and a fast one on another, it inadvertently happens that things come to a crawl. In my case, this happened for uploads. Indeed I have an upstream of 600kb/s on the WAN. It doesn't help that the WAN's downstream is much more with about 5000kb/s. The LAN is of course 100Mb/s. Doing a big upload with TCP (e.g. FTP), the Carambola even decided at some point that the network should be shut down and restartet, causing my ISP to assign me a new IP.
But why does this happen? Shouldn't it just work even with
different speeds? To answer this question, we have to look at how
networking is implemented in the Carambola's hardware:
 You can see that the CPU is connected to a switch via a single port.
Every packet the switch receives from one of the networks attached to
it is tagged with a label indicating which interface it came from and
then sent to the CPU through the single channel. On the other hand,
packets which are supposed to be sent are tagged by the CPU with the
respective interface label and then processed by the switch
accordingly. It is important to know that there are queues at variaous
places. Besides the queues in the hardware, there is also a software
queue for every interface. It stores outgoing packets on the
respective interface. Its length is set by the parameter
You can see that the CPU is connected to a switch via a single port.
Every packet the switch receives from one of the networks attached to
it is tagged with a label indicating which interface it came from and
then sent to the CPU through the single channel. On the other hand,
packets which are supposed to be sent are tagged by the CPU with the
respective interface label and then processed by the switch
accordingly. It is important to know that there are queues at variaous
places. Besides the queues in the hardware, there is also a software
queue for every interface. It stores outgoing packets on the
respective interface. Its length is set by the parameter
txqueuelen. Since packets are about 1500B in size and my
upstream reaches 600kB/s, about 400 packets can be sent through this
connection in a second. Unfortunately, by default eth0 has
a queue of length 1000. It fills up with packages for WAN essentially
blocking those that should go out to LAN much faster.
root@OpenWrt:/etc/config# ifconfig
6rd-6rd   Link encap:IPv6-in-IPv4
          inet6 addr: ::83.78.14.23/128 Scope:Compat
          inet6 addr: 2a02:1205:34e0:e170::1/28 Scope:Global
          UP RUNNING NOARP  MTU:1480  Metric:1
          RX packets:0 errors:0 dropped:0 overruns:0 frame:0
          TX packets:0 errors:0 dropped:0 overruns:0 carrier:0
          collisions:0 txqueuelen:0
          RX bytes:0 (0.0 B)  TX bytes:0 (0.0 B)

br-lan    Link encap:Ethernet  HWaddr C4:93:00:00:0D:7F
          inet addr:192.168.0.1  Bcast:192.168.0.255  Mask:255.255.255.0
          inet6 addr: fe80::c693:ff:fe00:d7f/64 Scope:Link
          UP BROADCAST RUNNING MULTICAST  MTU:1500  Metric:1
          RX packets:23 errors:0 dropped:0 overruns:0 frame:0
          TX packets:18 errors:0 dropped:0 overruns:0 carrier:0
          collisions:0 txqueuelen:0
          RX bytes:1622 (1.5 KiB)  TX bytes:1996 (1.9 KiB)

eth0      Link encap:Ethernet  HWaddr C4:93:00:00:0D:7F
          inet6 addr: fe80::c693:ff:fe00:d7f/64 Scope:Link
          UP BROADCAST RUNNING MULTICAST  MTU:1500  Metric:1
          RX packets:1472 errors:0 dropped:0 overruns:0 frame:0
          TX packets:1118 errors:0 dropped:0 overruns:0 carrier:0
          collisions:0 txqueuelen:1000
          RX bytes:131371 (128.2 KiB)  TX bytes:144266 (140.8 KiB)
          Interrupt:5

eth0.1    Link encap:Ethernet  HWaddr C4:93:00:00:0D:7F
          UP BROADCAST RUNNING MULTICAST  MTU:1500  Metric:1
          RX packets:23 errors:0 dropped:0 overruns:0 frame:0
          TX packets:18 errors:0 dropped:0 overruns:0 carrier:0
          collisions:0 txqueuelen:0
          RX bytes:1622 (1.5 KiB)  TX bytes:1996 (1.9 KiB)

eth0.2    Link encap:Ethernet  HWaddr C4:93:00:00:0D:7F
          inet6 addr: fe80::c693:ff:fe00:d7f/64 Scope:Link
          UP BROADCAST RUNNING MULTICAST  MTU:1500  Metric:1
          RX packets:15 errors:0 dropped:0 overruns:0 frame:0
          TX packets:18 errors:0 dropped:0 overruns:0 carrier:0
          collisions:0 txqueuelen:0
          RX bytes:705 (705.0 B)  TX bytes:931 (931.0 B)

lo        Link encap:Local Loopback
          inet addr:127.0.0.1  Mask:255.0.0.0
          inet6 addr: ::1/128 Scope:Host
          UP LOOPBACK RUNNING  MTU:16436  Metric:1
          RX packets:0 errors:0 dropped:0 overruns:0 frame:0
          TX packets:0 errors:0 dropped:0 overruns:0 carrier:0
          collisions:0 txqueuelen:0
          RX bytes:0 (0.0 B)  TX bytes:0 (0.0 B)

pppoe-wan Link encap:Point-to-Point Protocol
          inet addr:83.78.14.23  P-t-P:83.78.0.1  Mask:255.255.255.255
          UP POINTOPOINT RUNNING NOARP MULTICAST  MTU:1492  Metric:1
          RX packets:3 errors:0 dropped:0 overruns:0 frame:0
          TX packets:3 errors:0 dropped:0 overruns:0 carrier:0
          collisions:0 txqueuelen:3
          RX bytes:54 (54.0 B)  TX bytes:54 (54.0 B)
An intermediate solution is to set the length of the offending
queue to 0 using ifconfig eth0 txqueuelen 0. The problem
with this is that too many packets will be dropped in either
direction. Trying different queue length for the interfaces might
improve the situation a little bit. Unfortunately, there is more to
it.
It is important for the tests of this section that all queues have length 0!
When it comes to downstream, there is a buffer at the provider's
router (and in fact, there are buffers all over the internet). I can
hardly control them except via some nasty tricks. Pinging my router
from the outside once while having no other traffic and once while
downloading a huge file with wget yields a time
difference of about 800ms. I check upstream buffers by pinging my PPPoE
pear once without upload:
root@OpenWrt:~# ifconfig
...
pppoe-wan Link encap:Point-to-Point Protocol
          inet addr:81.62.130.232  P-t-P:81.62.128.1  Mask:255.255.255.255
          UP POINTOPOINT RUNNING NOARP MULTICAST  MTU:1492  Metric:1
          RX packets:8262 errors:0 dropped:0 overruns:0 frame:0
          TX packets:7545 errors:0 dropped:0 overruns:0 carrier:0
          collisions:0 txqueuelen:0
          RX bytes:6876308 (6.5 MiB)  TX bytes:1040389 (1016.0 KiB)

root@OpenWrt:~# ping -c 10 81.62.128.1
PING 81.62.128.1 (81.62.128.1): 56 data bytes
64 bytes from 81.62.128.1: seq=0 ttl=255 time=15.185 ms
64 bytes from 81.62.128.1: seq=1 ttl=255 time=15.134 ms
64 bytes from 81.62.128.1: seq=2 ttl=255 time=18.721 ms
64 bytes from 81.62.128.1: seq=3 ttl=255 time=15.179 ms
64 bytes from 81.62.128.1: seq=4 ttl=255 time=14.864 ms
64 bytes from 81.62.128.1: seq=5 ttl=255 time=15.006 ms
64 bytes from 81.62.128.1: seq=6 ttl=255 time=15.180 ms
64 bytes from 81.62.128.1: seq=7 ttl=255 time=14.848 ms
64 bytes from 81.62.128.1: seq=8 ttl=255 time=15.499 ms
64 bytes from 81.62.128.1: seq=9 ttl=255 time=14.918 ms

--- 81.62.128.1 ping statistics ---
10 packets transmitted, 10 packets received, 0% packet loss
round-trip min/avg/max = 14.848/15.453/18.721 ms
And once while uploading something via FTP:
root@OpenWrt:~# ping -c 10 81.62.128.1
PING 81.62.128.1 (81.62.128.1): 56 data bytes
64 bytes from 81.62.128.1: seq=0 ttl=255 time=1215.940 ms
64 bytes from 81.62.128.1: seq=1 ttl=255 time=1427.304 ms
64 bytes from 81.62.128.1: seq=2 ttl=255 time=1553.883 ms
64 bytes from 81.62.128.1: seq=3 ttl=255 time=1510.685 ms
64 bytes from 81.62.128.1: seq=4 ttl=255 time=1276.697 ms
64 bytes from 81.62.128.1: seq=5 ttl=255 time=1339.703 ms
64 bytes from 81.62.128.1: seq=6 ttl=255 time=957.388 ms
64 bytes from 81.62.128.1: seq=7 ttl=255 time=1020.394 ms
64 bytes from 81.62.128.1: seq=8 ttl=255 time=1125.260 ms
64 bytes from 81.62.128.1: seq=9 ttl=255 time=1188.588 ms

--- 81.62.128.1 ping statistics ---
10 packets transmitted, 10 packets received, 0% packet loss
round-trip min/avg/max = 957.388/1261.584/1553.883 ms
Because these tests were done with all router queues deactivated, it means that I have measured the hardware queue on the carambola plus the queue in the modem. It is stupid for a modem in bridge mode to have such a long queue. Unfortunately, there is no way to configure it. In order to prevent the modem's queue from filling up, I restrict the upstream on the Carambola to something slightly less than the available bandwidth. How this is done is explained in a later section.
Here I present my final configuration to my congestion problems.
Just to be shure, I deactivate the problematic queue such that things don't
break. This can easily be done by adding the following to
/etc/rc.local:
# Remove too long queue
ifconfig eth0 txqueuelen 0
QoS, which I will install shortly, takes care of the other queue sizes itself.
First, the package qos-scripts is needed:
root@OpenWrt:~# opkg update
Downloading http://pkg.8devices.com/v2.3/carambola/packages/Packages.gz.
Inflating http://pkg.8devices.com/v2.3/carambola/packages/Packages.gz.
Updated list of available packages in /var/opkg-lists/snapshots.
root@OpenWrt:~# opkg list | grep qos
luci-app-qos - trunk+svn-1 - Quality of Service configuration module
qos-scripts - 1.2.1-6 - A set of scripts that abstract QoS configuration into a simple
root@OpenWrt:~# opkg install qos-scripts
Installing qos-scripts (1.2.1-6) to root...
Downloading http://pkg.8devices.com/v2.3/carambola/packages/qos-scripts_1.2.1-6_all.ipk.
Collected errors:
 * satisfy_dependencies_for: Cannot satisfy the following dependencies for qos-scripts:
 *      kernel (= 3.3.8-1-f27716564eeeeafcc22d7525ba45fdac) *   kernel (= 3.3.8-1-f27716564eeeeafcc22d7525ba45fdac)
 *   kernel (= 3.3.8-1-f27716564eeeeafcc22d7525ba45fdac) *   kernel (= 3.3.8-1-f27716564eeeeafcc22d7525ba45fdac)
 *   kernel (= 3.3.8-1-f27716564eeeeafcc22d7525ba45fdac) *         kernel (= 3.3.8-1-f27716564eeeeafcc22d7525ba45fdac)
 *   kernel (= 3.3.8-1-f27716564eeeeafcc22d7525ba45fdac) *
 * opkg_install_cmd: Cannot install package qos-scripts.
root@OpenWrt:~# opkg install --force-depends qos-scripts
Installing qos-scripts (1.2.1-6) to root...
Downloading http://pkg.8devices.com/v2.3/carambola/packages/qos-scripts_1.2.1-6_all.ipk.
Installing tc (3.3.0-1) to root...
Downloading http://pkg.8devices.com/v2.3/carambola/packages/tc_3.3.0-1_ramips.ipk.
Installing kmod-sched-core (3.3.8-1) to root...
Downloading http://pkg.8devices.com/v2.3/carambola/packages/kmod-sched-core_3.3.8-1_ramips.ipk.
Installing kmod-sched-connmark (3.3.8-1) to root...
Downloading http://pkg.8devices.com/v2.3/carambola/packages/kmod-sched-connmark_3.3.8-1_ramips.ipk.
Installing kmod-ipt-conntrack-extra (3.3.8-1) to root...
Downloading http://pkg.8devices.com/v2.3/carambola/packages/kmod-ipt-conntrack-extra_3.3.8-1_ramips.ipk.
Installing kmod-ifb (3.3.8-1) to root...
Downloading http://pkg.8devices.com/v2.3/carambola/packages/kmod-ifb_3.3.8-1_ramips.ipk.
Installing iptables-mod-filter (1.4.10-4) to root...
Downloading http://pkg.8devices.com/v2.3/carambola/packages/iptables-mod-filter_1.4.10-4_ramips.ipk.
Installing kmod-ipt-filter (3.3.8-1) to root...
Downloading http://pkg.8devices.com/v2.3/carambola/packages/kmod-ipt-filter_3.3.8-1_ramips.ipk.
Installing kmod-lib-textsearch (3.3.8-1) to root...
Downloading http://pkg.8devices.com/v2.3/carambola/packages/kmod-lib-textsearch_3.3.8-1_ramips.ipk.
Installing iptables-mod-ipopt (1.4.10-4) to root...
Downloading http://pkg.8devices.com/v2.3/carambola/packages/iptables-mod-ipopt_1.4.10-4_ramips.ipk.
Installing kmod-ipt-ipopt (3.3.8-1) to root...
Downloading http://pkg.8devices.com/v2.3/carambola/packages/kmod-ipt-ipopt_3.3.8-1_ramips.ipk.
Installing iptables-mod-conntrack-extra (1.4.10-4) to root...
Downloading http://pkg.8devices.com/v2.3/carambola/packages/iptables-mod-conntrack-extra_1.4.10-4_ramips.ipk.
Configuring kmod-sched-core.
Configuring kmod-ipt-conntrack-extra.
Configuring kmod-sched-connmark.
Configuring kmod-lib-textsearch.
Configuring kmod-ipt-filter.
Configuring tc.
Configuring kmod-ipt-ipopt.
Configuring iptables-mod-ipopt.
Configuring iptables-mod-filter.
Configuring iptables-mod-conntrack-extra.
Configuring kmod-ifb.
Configuring qos-scripts.
Collected errors:
 * satisfy_dependencies_for: Cannot satisfy the following dependencies for qos-scripts:
 *      kernel (= 3.3.8-1-f27716564eeeeafcc22d7525ba45fdac) *   kernel (= 3.3.8-1-f27716564eeeeafcc22d7525ba45fdac)
 *   kernel (= 3.3.8-1-f27716564eeeeafcc22d7525ba45fdac) *   kernel (= 3.3.8-1-f27716564eeeeafcc22d7525ba45fdac)
 *   kernel (= 3.3.8-1-f27716564eeeeafcc22d7525ba45fdac) *         kernel (= 3.3.8-1-f27716564eeeeafcc22d7525ba45fdac)
 *   kernel (= 3.3.8-1-f27716564eeeeafcc22d7525ba45fdac) *
The new configuration file /etc/config/qos is now to
be adapted. Its
documentation
should help with this.
The default configuration looks nearly like what I want:
# QoS configuration for OpenWrt

# INTERFACES:
config interface wan
        option classgroup  "Default"
        option enabled      0
        option upload       128
        option download     1024

# RULES:
config classify
        option target       "Priority"
        option ports        "22,53"
config classify
        option target       "Normal"
        option proto        "tcp"
        option ports        "20,21,25,80,110,443,993,995"
config classify
        option target       "Express"
        option ports        "5190"
config default
        option target       "Express"
        option proto        "udp"
        option pktsize      "-500"
config reclassify
        option target       "Priority"
        option proto        "icmp"
config default
        option target       "Bulk"
        option portrange    "1024-65535"
config reclassify
        option target       "Priority"
        option proto        "tcp"
        option pktsize      "-128"
        option mark         "!Bulk"
        option tcpflags     "SYN"
config reclassify
        option target       "Priority"
        option proto        "tcp"
        option pktsize      "-128"
        option mark             "!Bulk"
        option tcpflags     "ACK"


# Don't change the stuff below unless you
# really know what it means :)

config classgroup "Default"
        option classes      "Priority Express Normal Bulk"
        option default      "Normal"


config class "Priority"
        option packetsize  400
        option maxsize     400
        option avgrate     10
        option priority    20
config class "Priority_down"
        option packetsize  1000
        option avgrate     10


config class "Express"
        option packetsize  1000
        option maxsize     800
        option avgrate     50
        option priority    10

config class "Normal"
        option packetsize  1500
        option packetdelay 100
        option avgrate     10
        option priority    5
config class "Normal_down"
        option avgrate     20

config class "Bulk"
        option avgrate     1
        option packetdelay 200
Some changes to this should be made depending on ones needs. The important thing however is, that ICMP, TCP SYN, and TCP ACK already are configured to have priority.
Download and upload speeds must be set. They are in Kb/s (kilobits per second). Download is a little bit exagerated, I don't care much about full queues on the ISP for now. The upload is deliberately chosen smaller than the actual 500kb/s in order to acommodate for ADSL/PPPoE overhead:
# INTERFACES:
config interface wan
        option classgroup  "Default"
        option enabled      1
        option upload       400
        option download     6144
In order to get things going, do /etc/init.d/qos
start and /etc/init.d/network restart. When
things turn out to be stable, running
/etc/init.d/qos enable causes QoS to be activated at
bootup.
In order to test the configuration, I upload a big file and at the same time download another one. Note that the download goes full speed. The upload drowns to about 1/3 of the expected speed, but this is reasonable, since the uplink is very slow and all the ACKs from the download need to go through the same link. (Note that ADSL has a minimum packet size as far as I understand. This causes an ACK to be very expensive.)
urs@speedy:~$ wget ftp://mirror.switch.ch/mirror/knoppix/KNOPPIX_V7.0.4CD-2012-08-20-DE.iso -4
--2013-03-12 15:35:23--  ftp://mirror.switch.ch/mirror/knoppix/KNOPPIX_V7.0.4CD-2012-08-20-DE.iso
           => »KNOPPIX_V7.0.4CD-2012-08-20-DE.iso.2«
Auflösen des Hostnamen »mirror.switch.ch (mirror.switch.ch)«... 130.59.10.36
Verbindungsaufbau zu mirror.switch.ch (mirror.switch.ch)|130.59.10.36|:21... verbunden.
Anmelden als anonymous ... Angemeldet!
==> SYST ... fertig.    ==> PWD ... fertig.
==> TYPE I ... fertig.  ==> CWD (1) /mirror/knoppix ... fertig.
==> SIZE KNOPPIX_V7.0.4CD-2012-08-20-DE.iso ... 729157632
==> PASV ... fertig.    ==> RETR KNOPPIX_V7.0.4CD-2012-08-20-DE.iso ... fertig.
Länge: 729157632 (695M) (unmaßgeblich)
 2% [=>                                                     ] 17'043'584   522K/s  ETA 22m 10s
lftp andonyar@andonyar.com:/private> put Unix_terminals_and_shells_-_3_of_5-GA2mIUQq48s.mp4
»Unix_terminals_and_shells_-_3_of_5-GA2mIUQq48s.mp4« bei 835200 (1%) 15.2K/s ca. fertig:79m [Sende Daten]
Interestingly, it seems to work with IPv6 too:
urs@speedy:~$ wget ftp://mirror.switch.ch/mirror/knoppix/KNOPPIX_V7.0.4CD-2012-08-20-DE.iso
--2013-03-12 15:36:16--  ftp://mirror.switch.ch/mirror/knoppix/KNOPPIX_V7.0.4CD-2012-08-20-DE.iso
           => »KNOPPIX_V7.0.4CD-2012-08-20-DE.iso.3«
Auflösen des Hostnamen »mirror.switch.ch (mirror.switch.ch)«... 2001:620:0:8::20, 130.59.10.36
Verbindungsaufbau zu mirror.switch.ch (mirror.switch.ch)|2001:620:0:8::20|:21... verbunden.
Anmelden als anonymous ... Angemeldet!
==> SYST ... fertig.    ==> PWD ... fertig.
==> TYPE I ... fertig.  ==> CWD (1) /mirror/knoppix ... fertig.
==> SIZE KNOPPIX_V7.0.4CD-2012-08-20-DE.iso ... 729157632
==> EPSV ... fertig.    ==> RETR KNOPPIX_V7.0.4CD-2012-08-20-DE.iso ... fertig.
Länge: 729157632 (695M) (unmaßgeblich)
 3% [=>                                                     ] 23'118'464   485K/s  ETA 23m 39s
lftp andonyar@andonyar.com:/private> put Unix_terminals_and_shells_-_3_of_5-GA2mIUQq48s.mp4
»Unix_terminals_and_shells_-_3_of_5-GA2mIUQq48s.mp4« bei 2318400 (3%) 14.0K/s ca. fertig:55m [Sende Daten]
Why this works is not immediately clear: IPv6 packets go through the 6rd interface for which QoS is not activated. It puts the packets in IPv4 packets which then go through WAN with QoS. But I am quite shure that QoS does not look inside the encapsulating IPv4 packets. Likely, QoS decides in this case by size, since small packets are preferred by the above configuration. Acks are small, therefore they have priority. Port and protocol based priorities will likely not work.
This section shows how to install the kernel modules for USB storage and ext4 support. The initial idea was to provide a way to recover from a configuration that breaks networking: At boot, check whether there is a USB stick and then revert the configuration and execute the commands found on the stick. I never impleneted this idea though.
root@OpenWrt:/etc/config# lsmod | grep usb

root@OpenWrt:/etc/config# opkg list-installed | grep usb

root@OpenWrt:/etc/config# opkg list-installed | grep ext
root@OpenWrt:/etc/config# opkg install kmod-fs-ext4

root@OpenWrt:/etc/config# opkg install --force-depends kmod-fs-ext4
The deamon myip6updated could probably (and maybe
even should) be replaced with hotplug scripts in
/etc/hotplug.d/iface/.
When compiling modules, there is for shure a way to not compile the rest of the kernel. This would drastically cut down on the power bill.